Instructions
- Prepare the Pork Ears: If using fresh pork ears, inspect them thoroughly for any stray hairs. You can use a small kitchen torch to singe them off, or a sharp razor. Rinse them well under cold running water. If using frozen, thaw them completely in the refrigerator overnight.
- First Boil (Blanching): In a large pot, combine the pork ears, 8 cups of water, 1/4 cup white vinegar, and the sliced ginger. Bring to a rolling boil over high heat. Reduce heat to medium-low and simmer for 15-20 minutes. This step helps to clean the ears, remove impurities, and reduce any gamey smell.
- Cool and Clean: Drain the pork ears and rinse them again under cold water. Let them cool enough to handle. Use a spoon or knife to scrape off any remaining surface impurities or wax-like material. Pat them thoroughly dry with paper towels.
- Slice the Ears: Using a sharp knife, slice the pork ears into thin strips, about 1/4 inch thick and 2-3 inches long. You can also slice them into bite-sized pieces, depending on your preference.
- Prepare Aromatics: Mince the garlic, chop the shallot/onion, mince the fresh ginger, and slice the red and green chilies.
- Sauté Aromatics: Heat 2 tablespoons of cooking oil in a large wok or a deep, heavy-bottomed pan over medium-high heat. Add the minced garlic, chopped shallot/onion, and minced ginger. Sauté for 1-2 minutes until fragrant, being careful not to burn the garlic.
- Add Chilies and Optional Sichuan Peppercorns: Add the sliced red and green chilies (and crushed Sichuan peppercorns if using) to the wok. Sauté for another 30 seconds to release their aroma and heat.
- Sear the Pork Ears: Add the sliced pork ears to the wok. Stir-fry for 3-5 minutes until they start to get a little color and some crispiness on the edges. This step adds depth of flavor and texture.
- Deglaze and Add Liquids: Pour in the soy sauce, dark soy sauce, Chinese black vinegar, and brown sugar. Stir well to coat the pork ears evenly. Add the chicken/pork broth (or water).
- Simmer and Braise: Bring the mixture to a gentle boil. Reduce the heat to low, cover the pan, and let it simmer for 45-60 minutes, or until the pork ears are tender but still retain a slight chewiness. Stir occasionally to prevent sticking. The goal is for them to be tender but not mushy.
- Thicken the Sauce: Once the pork ears are tender, uncover the pan. Increase the heat to medium-high. Stir in the white pepper and sesame oil. Give the cornstarch slurry a quick stir and then slowly pour it into the simmering sauce while stirring continuously. Cook for 1-2 minutes until the sauce thickens to your desired consistency. It should coat the back of a spoon.
- Taste and Adjust: Taste the sauce and adjust seasonings as needed. You might want more sugar for sweetness, more vinegar for tang, or a pinch of salt if using unsalted broth.
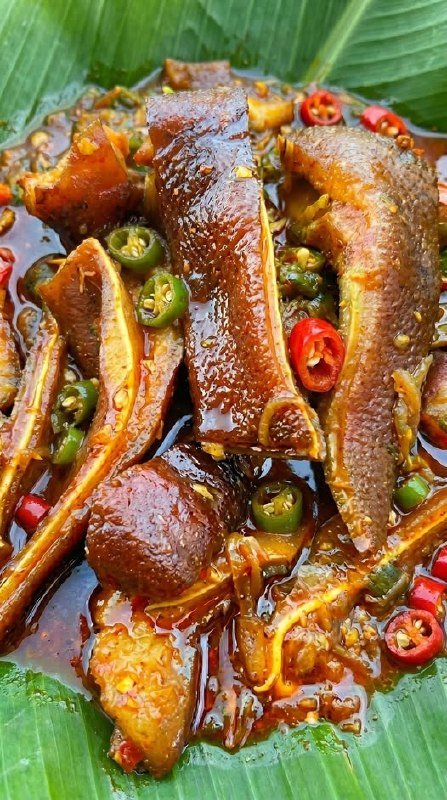
- Serve: Transfer the braised pork ears to a serving platter, ideally lined with a banana leaf for an authentic touch. Garnish generously with sliced green onions and fresh chopped cilantro. Serve immediately as an appetizer or side dish with steamed rice.
Cooking Tips and Variations
Achieving the Perfect Texture: The key to delicious braised pork ears is balancing tenderness with a satisfying chew. The initial blanching softens them, and the subsequent braising continues this process. Don’t overbraise them to the point of mushiness; they should still have a delightful, slightly springy resistance when bitten. The frying step before braising helps to develop some exterior crispness that holds up well.
Spice Level Control: The amount of red and green chilies can be adjusted dramatically. For a milder dish, remove the seeds from the chilies or use fewer. For a fiery kick, add more bird’s eye chilies or even a dash of chili oil at the end. For an extra layer of heat and complexity, consider adding a pinch of dried chili flakes or a spoonful of gochugaru (Korean chili powder) during the sautéing stage.
Flavor Profile Adjustments:
- Sweetness: If you prefer a sweeter sauce, increase the brown sugar slightly.
- Tanginess: For more tang, add an extra splash of Chinese black vinegar or even a squeeze of lime juice at the very end for brightness.
- Umami Boost: A dash of oyster sauce or a teaspoon of mushroom powder can deepen the umami flavor of the sauce.
- Aromatic Variations: Experiment with adding star anise, a cinnamon stick, or a bay leaf to the braising liquid for a more complex aromatic profile, especially if you enjoy traditional Chinese braises.
Serving Suggestions:
- These braised pork ears are fantastic as a standalone appetizer, often served with toothpicks for easy snacking.
- They make an excellent side dish to steamed white rice, allowing the rice to soak up the delicious sauce.
- Chop them finer and use them as a topping for congee (rice porridge) or noodles.
- For a party, serve them in small individual bowls garnished with extra fresh herbs.
Vegetable Additions: While traditionally served plain, you can add vegetables like sliced bell peppers, snow peas, or even blanched broccoli florets in the last 5-10 minutes of cooking to add color and nutrients. They will absorb some of the sauce’s flavor.
Garnish Power: Don’t skip the fresh garnishes! Sliced green onions and cilantro not only add a pop of color but also provide a fresh, aromatic contrast to the rich, savory pork ears.
Storage and Reheating
Storage: Allow the braised pork ears to cool completely to room temperature before storing. Transfer them to an airtight container. They can be stored in the refrigerator for up to 3-4 days. For longer storage, they can be frozen. Place the cooled pork ears and sauce in a freezer-safe container or heavy-duty freezer bag. They will keep in the freezer for up to 2-3 months. Thaw overnight in the refrigerator before reheating.
Reheating:
- Stovetop: This is the preferred method for reheating to maintain texture. Transfer the desired portion of pork ears and sauce to a small saucepan or skillet. Add a splash of water or broth (about 1-2 tablespoons) to prevent drying out. Heat over medium-low heat, stirring occasionally, until heated through. If the sauce has thickened too much, you can add a little more liquid.
- Microwave: For a quick reheat, place the pork ears and sauce in a microwave-safe dish. Cover loosely with a lid or microwave-safe plastic wrap (vented). Heat on medium power in 1-minute intervals, stirring in between, until hot. Be careful not to overheat, as this can make the pork ears tough.
- Oven: If reheating a larger batch, you can use the oven. Preheat your oven to 300°F (150°C). Place the pork ears and sauce in an oven-safe dish, covered with foil. Heat for 15-20 minutes, or until thoroughly warmed through.
No matter the method, ensure the pork ears are heated to an internal temperature of 165°F (74°C) for food safety. The texture might soften slightly upon reheating, but the flavors will remain delicious.
Frequently Asked Questions
What do pork ears taste like?
Pork ears themselves have a very mild, slightly porky flavor, similar to pork skin. Their primary appeal comes from their unique texture – a combination of tender, gelatinous cartilage and a slight chewiness, often described as ‘crunchy-chewy.’ They are excellent at absorbing the flavors of the sauces and spices they are cooked in, making them incredibly versatile.
Are pork ears healthy?
Pork ears are a good source of protein and collagen, which is beneficial for skin, hair, and joint health. However, they can also be high in fat and cholesterol, depending on the preparation method. When braised, some of the fat renders out, but they are still a rich food. Enjoying them in moderation as part of a balanced diet is key.
Where can I buy pork ears?
You can typically find fresh or frozen pork ears at Asian grocery stores, specialty butcher shops, or sometimes at larger supermarkets with a diverse meat selection. If you don’t see them readily available, ask your butcher, as they can often order them for you.
Can I make this dish less spicy?
Absolutely! To reduce the spice level, simply use fewer fresh chilies, or remove the seeds and membranes from the chilies before slicing. You can also opt for milder chili varieties like bell peppers for color without the heat, or omit them entirely. The dish will still be flavorful due to the other aromatics and sauces.