Instructions
Part 1: Making the Dough (Skip to Part 2 if using store-bought dough)
- In a large mixing bowl, combine the warm milk, yeast, and sugar. Stir gently and let it sit for 5-10 minutes, or until foamy, indicating the yeast is active.
- Add the beaten egg, melted butter, and salt to the yeast mixture. Mix well to combine.
- Gradually add 3 cups of flour, one cup at a time, mixing with a wooden spoon or a stand mixer with a dough hook until a shaggy dough forms.
- Turn the dough out onto a lightly floured surface and knead for 5-7 minutes, adding up to 1/2 cup more flour if needed, until the dough is smooth and elastic. Alternatively, use a stand mixer with a dough hook on medium speed for 5-7 minutes.
- Lightly grease a clean bowl with a little oil. Place the dough in the bowl, turning once to coat. Cover the bowl with plastic wrap or a clean kitchen towel and let it rise in a warm place for 1 to 1 1/2 hours, or until doubled in size.
Part 2: Preparing the Filling
- While the dough is rising (or as you prepare to use store-bought dough), heat a large skillet over medium-high heat. Add the ground meat and cook, breaking it up with a spoon, until it’s browned and cooked through. Drain off any excess fat.
- Add the finely chopped onion and minced garlic to the skillet with the cooked meat. Sauté for 3-5 minutes, or until the onion is softened and translucent.
- Remove the skillet from the heat. Add the softened cream cheese, shredded cheddar cheese, Worcestershire sauce, Italian seasoning, black pepper, and salt to the meat mixture. Stir well until the cheeses are melted and fully incorporated, and the filling is uniform.
- Taste the filling and adjust seasonings if necessary. Set the filling aside to cool slightly while you prepare the dough. It’s important that the filling isn’t too hot when you assemble the rolls, as it can melt the dough prematurely.
Part 3: Assembling the Rolls
- Once the dough has risen (or if using store-bought crescent roll dough, unroll it now), gently punch it down to release the air.
- Turn the dough out onto a lightly floured surface. Divide the dough into two equal portions.
- Roll out one portion of dough into a large circle, approximately 12-14 inches in diameter and about 1/8 to 1/4 inch thick.
- Using a pizza cutter or a sharp knife, cut the circle into 12-16 wedges (like slicing a pizza).
- Place about 1 tablespoon of the cooled filling onto the wide end of each dough wedge.
- Starting from the wide end, carefully roll up each wedge towards the pointed end, forming a crescent shape.
- Repeat with the second portion of dough and the remaining filling.
- Preheat your oven to 375°F (190°C). Line two large baking sheets with parchment paper.
- Arrange the assembled rolls on the prepared baking sheets, leaving about 1-2 inches between each roll.
- In a small bowl, whisk together the beaten egg and water to create an egg wash.
- Brush the tops of each roll generously with the egg wash. If desired, sprinkle with sesame seeds or poppy seeds.
Part 4: Baking the Rolls
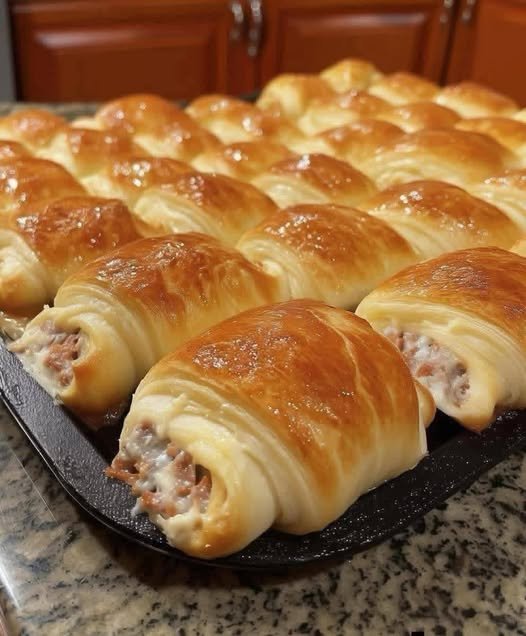
- Bake the rolls for 15-20 minutes, or until they are puffed up, golden brown, and the filling is heated through. Baking time may vary depending on your oven and the size of your rolls.
- Remove the rolls from the oven and let them cool on the baking sheets for a few minutes before transferring them to a wire rack.
- Serve warm and watch them disappear!
Cooking Tips and Variations
Tips for Best Results:
- Don’t Overfill: While it’s tempting to load up on the delicious filling, too much can cause the rolls to burst open during baking. Stick to about a tablespoon per roll.
- Cool the Filling: Ensure your meat and cheese filling has cooled down to at least room temperature before you add it to the dough. Hot filling can make the dough sticky and difficult to work with, and can even start to cook the dough prematurely.
- Egg Wash is Key: Don’t skip the egg wash! It’s what gives these rolls their beautiful, glossy, golden-brown finish that makes them so appealing.
- Even Rolling: Try to roll your dough to an even thickness. This ensures consistent baking and a uniform texture.
- Store-Bought Shortcut: For an incredibly quick version, use two cans (8 ounces each) of refrigerated crescent roll dough. Simply unroll the dough, separate into triangles, fill, roll, and bake as directed. It cuts down on prep time significantly without sacrificing much flavor.
- Don’t Overbake: Keep an eye on the rolls towards the end of the baking time. They should be deeply golden brown, but not burnt. Overbaking can make them dry.
Recipe Variations:
- Cheesy Bacon Ranch: Add 1/4 cup cooked, crumbled bacon and 1 teaspoon ranch seasoning mix to the filling.
- Spicy Southwest: Mix in 2 tablespoons diced green chilies, 1/2 teaspoon cumin, and a pinch of cayenne pepper to the filling. Use Pepper Jack cheese instead of cheddar.
- Mushroom & Swiss: Sauté finely diced mushrooms with the onion, and use shredded Swiss cheese in the filling. A dash of thyme would be lovely here.
- Pizza Rolls: Use cooked ground Italian sausage, mini pepperoni, a tablespoon of pizza sauce, and shredded mozzarella cheese for a fun pizza-inspired twist.
- Vegetarian Option: Sauté finely diced mushrooms, bell peppers, and zucchini, then mix with cream cheese, shredded cheese, and seasonings for a delightful meat-free version.
- Herb Garden: Experiment with fresh herbs like finely chopped chives, parsley, or dill mixed into the filling for a fresh burst of flavor.
- Different Meats: Feel free to swap out the ground meat for finely diced cooked ham, shredded cooked chicken, or even a different type of sausage.
Storage and Reheating
If by some miracle you have any of these delicious rolls leftover (a big “if” in my house!), here’s how to store and reheat them:
Storage:
- At Room Temperature: Cooked rolls can be kept in an airtight container at room temperature for up to 1 day.
- Refrigeration: For longer storage, place cooled rolls in an airtight container and refrigerate for up to 3-4 days.
- Freezing (Cooked): To freeze cooked rolls, arrange them in a single layer on a baking sheet and freeze until solid. Once frozen, transfer them to a freezer-safe bag or container, removing as much air as possible. They can be frozen for up to 2-3 months.
- Freezing (Unbaked): If you want to prep ahead, you can freeze the assembled, unbaked rolls. Place them on a parchment-lined baking sheet and freeze until solid. Once frozen, transfer to a freezer bag. When ready to bake, place frozen rolls on a baking sheet, brush with egg wash, and bake at 375°F (190°C) for 20-25 minutes, or until golden brown and cooked through. You may need to add a few extra minutes to the baking time.
Reheating:
- Oven/Toaster Oven: This is the best method for reheating, as it helps restore the crispness of the crust. Preheat your oven or toaster oven to 350°F (175°C). Place the rolls on a baking sheet and heat for 8-12 minutes, or until warmed through and slightly crispy.
- Microwave: While convenient, microwaving will make the rolls softer and less crispy. Heat individual rolls for 15-30 seconds, or until warm. This is best for a quick snack, but the texture won’t be as good as oven reheating.
- Air Fryer: Reheat in an air fryer at 325°F (160°C) for 3-5 minutes, checking frequently, until warmed and crisp.
Frequently Asked Questions
Can I make the filling ahead of time?
Absolutely! The filling can be made up to 2-3 days in advance. Cook the meat, mix in the other ingredients, and then store it in an airtight container in the refrigerator. Just make sure to bring it to room temperature before assembling the rolls for easier handling.
What kind of ground meat works best?
Lean ground beef (80/20 or 90/10) is a popular choice, but ground pork, ground turkey, or even a blend of meats would work wonderfully. Just be sure to drain any excess fat after cooking to prevent the rolls from becoming greasy.
My dough isn’t rising. What went wrong?
There are a few common culprits for dough that won’t rise. The most likely reason is that your yeast wasn’t active. Ensure your milk is warm (105-115°F / 40-46°C) – too hot will kill the yeast, too cold won’t activate it. Also, check the expiration date on your yeast. If your yeast mixture didn’t get foamy after 5-10 minutes, your yeast might be dead, and it’s best to start over.
Can I make these rolls sweet instead of savory?
While this recipe is designed for a savory filling, the basic dough can certainly be adapted for sweet rolls! You could fill them with cinnamon sugar and cream cheese, fruit preserves, or a nutella mixture. Just omit the savory seasonings from the dough (like the salt) or adjust them to complement a sweet filling.