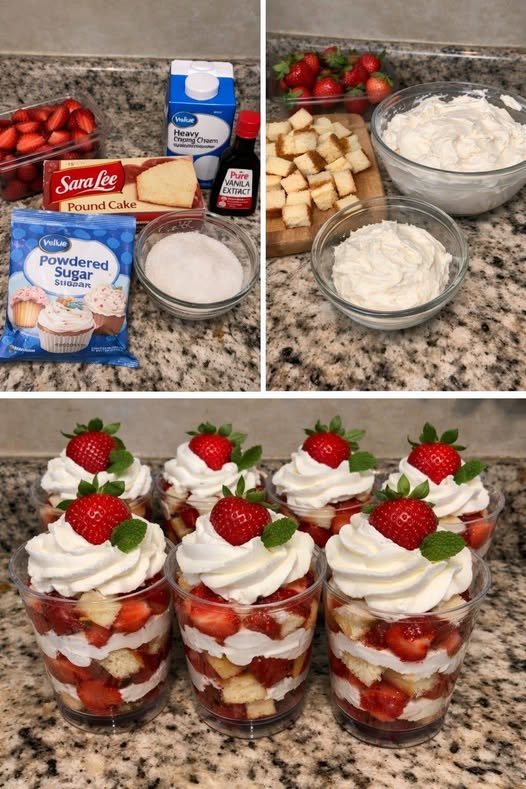
Instructions
- Begin by preparing the fresh strawberries. Gently wash and hull all the strawberries. For the best texture and flavor in your shortcake cups, slice about two-thirds of the strawberries into bite-sized pieces or dice them. Reserve the remaining one-third of the strawberries whole or halved for garnish later.
- In a medium bowl, combine the sliced or diced strawberries with 1/4 cup of granulated sugar. Gently toss the strawberries until they are evenly coated. Allow them to sit at room temperature for at least 15-30 minutes. This process, known as macerating, helps to draw out the natural juices from the strawberries, creating a delicious, sweet syrup that will enhance the flavor of your shortcake cups.
- While the strawberries are macerating, prepare the pound cake. Take your store-bought or homemade pound cake and carefully cut it into approximately 1-inch cubes. You want pieces that are easy to layer and can absorb some of the strawberry juices and cream. Set the pound cake cubes aside.
- Next, it’s time to make the homemade whipped cream. For the best results, ensure your heavy whipping cream is very cold. It also helps to chill your mixing bowl and whisk attachments (from a stand mixer or electric hand mixer) in the freezer for 10-15 minutes prior to whipping.
- Pour the very cold heavy whipping cream into the chilled bowl. Add the 1/4 cup of powdered sugar and the 1 teaspoon of pure vanilla extract.
- Using an electric mixer (either a stand mixer with the whisk attachment or an electric hand mixer), start on low speed to combine the ingredients, then gradually increase the speed to high. Whip the cream until it forms soft peaks. Be careful not to over-whip, as it can quickly turn into butter. The cream should be light, airy, and hold its shape.
- Now that all your components are ready, it’s time for the fun part: assembling your Strawberry Shortcake Cups! Gather your clear serving cups (8-10 oz cups work best to showcase the layers).
- Start by adding a layer of the pound cake cubes to the bottom of each serving cup. This will form a sturdy base.
- Next, spoon a generous layer of the macerated strawberries (including some of their delicious syrup) over the pound cake cubes. The syrup will start to soak into the cake, adding moisture and flavor.
- Follow the strawberries with a dollop or a piped layer of the freshly whipped cream. If you have a piping bag with a star tip, this is a great way to make the cream look extra fancy and professional.
- Repeat the layers: add another layer of pound cake cubes, then more macerated strawberries, and finally, another generous layer of whipped cream on top.
- To finish your beautiful Strawberry Shortcake Cups, garnish each one with a whole fresh strawberry or a halved strawberry. For an extra touch of freshness and visual appeal, add a small fresh mint leaf on top of the whipped cream.
- Serve your Strawberry Shortcake Cups immediately for the best texture and flavor. The cold whipped cream and fresh strawberries are a delight when enjoyed right away.
Cooking Tips and Variations
For the absolute best whipped cream, always start with very cold heavy cream. Chilling your mixing bowl and whisk attachments for 10-15 minutes in the freezer before whipping will dramatically improve the cream’s ability to hold air and create a stable, fluffy texture. When whipping, start on low speed to prevent splattering, then gradually increase to high. Watch carefully and stop as soon as soft peaks form to avoid over-whipping, which can quickly turn your cream grainy or even into butter.
Macerating the strawberries is a crucial step for maximizing flavor. Allowing the sliced strawberries to sit with a little granulated sugar for 15-30 minutes helps to draw out their natural juices, creating a luscious, natural syrup. This syrup not only sweetens the berries but also adds moisture and infuses the pound cake with an irresistible strawberry essence. You can even add a tiny squeeze of lemon juice to the berries along with the sugar to brighten their flavor.
While store-bought pound cake offers incredible convenience and is perfect for a quick dessert, don’t hesitate to use homemade pound cake if you have a favorite recipe and the time. Alternatively, angel food cake or even a dense vanilla sponge cake can be wonderful substitutions, offering a slightly different texture and flavor profile. For a gluten-free option, look for gluten-free pound cake or make your own.
These individual servings are fantastic for portion control and make serving a breeze at any gathering. They eliminate the need for plates and forks, making them ideal for picnics, potlucks, or backyard BBQs. The clear cups are not just practical; they also beautifully showcase the vibrant layers of cake, strawberries, and cream, making for an impressive presentation.
To make preparation easier for a party, you can prepare the components ahead of time. The strawberries can be macerated, the pound cake cubed, and the whipped cream made up to a few hours in advance. Store the strawberries and whipped cream separately in the refrigerator. Assemble the cups just before serving to prevent the pound cake from becoming too soggy, ensuring each bite is perfectly textured.
For an elevated presentation, use a piping bag fitted with a star tip to pipe the whipped cream layers. This creates beautiful swirls and a professional finish. Garnishing with a whole fresh strawberry and a sprig of fresh mint adds a pop of color and a refreshing aroma that enhances the overall experience.
Don’t be afraid to experiment with variations! While strawberries are classic, try using a mix of berries like raspberries, blueberries, or blackberries for a “mixed berry shortcake cup.” A drizzle of high-quality balsamic glaze over the macerated strawberries can add a sophisticated tang. For a touch of citrus, you could add a little lemon zest to the whipped cream. If you’re feeling adventurous, a hint of almond extract in the whipped cream or a different cake flavor like lemon or chocolate pound cake can create exciting new combinations.
Storage and Reheating
Strawberry Shortcake Cups are best enjoyed fresh, ideally within a few hours of assembly, to ensure the pound cake remains tender and the whipped cream retains its airy texture. However, if you have leftovers (which is unlikely, they’re so delicious!), or if you want to assemble them a little in advance, proper storage is key.
To store leftover Strawberry Shortcake Cups, cover each cup tightly with plastic wrap or transfer them to an airtight container. Refrigerate them immediately. They will keep well in the refrigerator for up to 1-2 days. Be aware that over time, the pound cake will absorb more moisture from the strawberries and whipped cream, becoming softer. While still delicious, the texture will change from freshly assembled.
These cups do not reheat well. The whipped cream will melt and lose its structure, and the strawberries will become even softer. They are designed to be served chilled or at room temperature. For the best experience, always serve them cold directly from the refrigerator.
If you plan to make these cups for an event and want to prepare ahead, it’s best to prepare the individual components separately. Macerate the strawberries and store them in an airtight container in the refrigerator. Cube the pound cake and keep it in an airtight container at room temperature (or refrigerated if you prefer). Make the whipped cream and store it in an airtight container in the refrigerator. Then, assemble the cups no more than 2-3 hours before serving. This “make-ahead component” strategy ensures that each layer maintains its ideal texture and freshness until it’s time to enjoy.
Frequently Asked Questions
Can I use frozen strawberries for this recipe?
While fresh strawberries are highly recommended for the best flavor and texture, you can use frozen strawberries in a pinch. If using frozen, thaw them completely and drain off any excess liquid before macerating with sugar. Be aware that thawed frozen strawberries tend to be softer and release more liquid, which might make your shortcake cups a bit wetter. They will still be delicious, but the texture will be different.
How far in advance can I make the whipped cream?
Homemade whipped cream is best when made fresh, ideally within a few hours of serving. If you need to make it further in advance, you can prepare it up to 24 hours ahead of time. Store it in an airtight container in the refrigerator. If it loses a little stiffness, you can gently re-whip it for a few seconds with an electric mixer before assembling, but be careful not to over-whip. Adding a teaspoon of cornstarch or cream of tartar when whipping can help stabilize the cream if you need to make it further in advance.
What if I don’t have clear cups?
No problem at all! While clear cups are fantastic for showcasing the beautiful layers, you can absolutely use any small bowls, ramekins, or even mason jars for serving. The taste will be just as wonderful, regardless of the vessel. If using opaque containers, you might just lose a bit of the visual appeal, but the deliciousness remains.
Can I make these into a large trifle instead of individual cups?
Absolutely! This recipe adapts beautifully into a larger trifle. Simply follow the same layering instructions, but use a large trifle bowl or a clear glass serving bowl instead of individual cups. The proportions will remain the same, just scaled up for a bigger presentation. A trifle is a stunning centerpiece for a larger gathering and offers the same delightful flavors as the individual cups.