Instructions
- Preheat your oven to 375°F (190°C). Line two baking sheets with parchment paper.
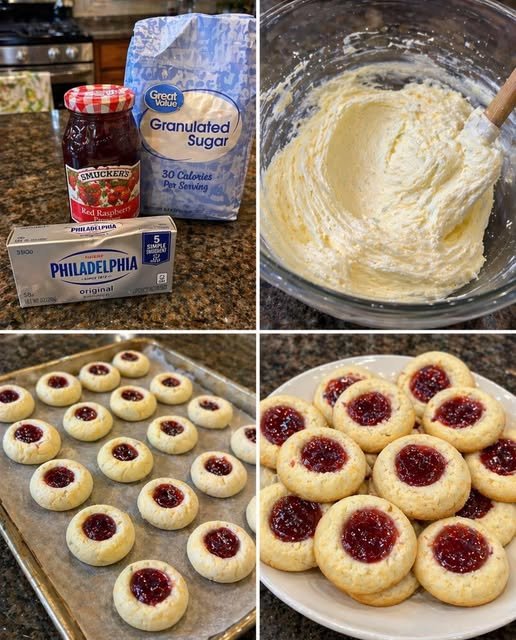
- In a large mixing bowl, using an electric mixer on medium speed, cream together the softened butter, cream cheese, and 1 cup of granulated sugar until the mixture is light and fluffy, about 3-4 minutes. Scrape down the sides of the bowl as needed.
- Beat in the egg yolk and vanilla extract until well combined and smooth.
- In a separate medium bowl, whisk together the all-purpose flour, baking powder, and salt.
- Gradually add the dry ingredients to the wet ingredients, mixing on low speed until just combined. Be careful not to overmix; stop as soon as no streaks of flour remain. The dough will be soft.
- If the dough is too sticky to handle, cover the bowl with plastic wrap and chill it in the refrigerator for 20-30 minutes.
- Using a small cookie scoop or your hands, roll the dough into 1-inch balls. If desired, roll each ball gently in the remaining 2 tablespoons of granulated sugar for an extra sparkle and slight crunch.
- Place the dough balls about 2 inches apart on the prepared baking sheets.
- Using your floured thumb or the back of a small measuring spoon (like a ½ teaspoon), gently press an indentation into the center of each cookie dough ball. Be careful not to press all the way through to the baking sheet. If the edges crack, gently pinch them back together.
- Fill each indentation with about ½ teaspoon of raspberry preserves. Don’t overfill, as the jam can bubble over during baking.
- Bake for 10-12 minutes, or until the edges are lightly golden and the cookies are set. The jam will be bubbly. For even baking, rotate the baking sheets halfway through the baking time.
- Remove the baking sheets from the oven and let the cookies cool on the sheets for 5 minutes before carefully transferring them to a wire rack to cool completely.
- Once completely cooled, you can optionally dust the cookies with powdered sugar for a finishing touch and an extra hint of sweetness.
- Serve and enjoy your homemade Raspberry Cream Cheese Thumbprint Cookies!
Cooking Tips and Variations
For the best results, always ensure your butter and cream cheese are at room temperature. This allows them to cream together smoothly with the sugar, creating an emulsified, airy base that results in a tender, melt-in-your-mouth cookie. Cold ingredients can lead to a lumpy dough and a denser cookie texture. Plan ahead and take them out of the refrigerator at least an hour before you start baking.
When adding the dry ingredients to the wet, mix only until just combined. Overmixing the flour can develop the gluten too much, leading to tough, chewy cookies instead of the desired tender crumb. As soon as you see no more streaks of flour, stop mixing. A few small lumps are perfectly fine and will disappear during baking.
If your dough feels too soft or sticky to handle after mixing, don’t hesitate to chill it. A quick 20-30 minute chill in the refrigerator will firm up the dough, making it much easier to roll into balls and press the indentations without it sticking to your hands or spreading too much in the oven. This step is especially helpful on warm days.
To create the perfect indentation, you can use your thumb, but a floured ½ teaspoon measuring spoon or a small wooden dowel can create a more uniform and neat well. Flour your chosen tool lightly to prevent sticking. If the edges of the cookie crack when you make the indentation, gently reshape and pinch them back together with your fingers.
To prevent the jam from bubbling over and potentially burning on the baking sheet, avoid overfilling the indentations. A good rule of thumb is about ½ teaspoon per cookie. If you prefer a very fresh, vibrant jam flavor, you can bake the cookies without jam, then fill the cooled indentations with jam, or even a simple lemon glaze, just before serving.
For even baking and consistent browning, rotate your baking sheets halfway through the baking time. Ovens often have hot spots, and rotating ensures all cookies get equal exposure to heat, resulting in uniformly golden edges.
Once baked, allow the cookies to cool on the baking sheet for about 5 minutes before transferring them to a wire rack. This initial cooling period allows them to set slightly, making them less fragile and easier to move without breaking. Cooling completely on a wire rack ensures air circulation, preventing the bottoms from becoming soggy.
Don’t be afraid to experiment with different jam flavors! While raspberry is a classic, these cookies are delicious with apricot, strawberry, blueberry, cherry, or even a citrus marmalade. Each variation offers a unique flavor profile. You can also add a touch of citrus zest (lemon or orange) to the cookie dough for an extra bright note that complements the fruit filling beautifully.
For an extra layer of flavor and visual appeal, consider adding a simple glaze. A thin drizzle of powdered sugar mixed with a little milk or lemon juice can be added once the cookies are completely cooled. This adds another touch of sweetness and a lovely finish.
To prevent cracks in your cookies, ensure your butter and cream cheese are very soft and well-creamed. Overmixing the flour can also contribute to a less pliable dough that cracks easily. If the dough is too dry, add a tiny bit of milk (1 teaspoon at a time) until it’s more workable, but avoid making it too wet.
If your dough is too crumbly, it might be over-floured or lacking enough fat. Check your measurements carefully. You can try adding a teaspoon of milk or an extra ½ teaspoon of softened butter to bring it together. If it’s too sticky, chilling is your best friend, or you can add a tiny bit more flour, a tablespoon at a time, until it’s manageable.
Storage and Reheating
Once completely cooled, Raspberry Cream Cheese Thumbprint Cookies should be stored in an airtight container at room temperature for up to 3-4 days. Placing a piece of parchment paper between layers can help prevent them from sticking together, especially if they have a powdered sugar dusting. For longer freshness, particularly in warmer climates, you can store them in the refrigerator for up to a week. If refrigerated, let them come to room temperature for about 15-20 minutes before serving to enjoy their best texture and flavor.
These cookies freeze beautifully, both baked and unbaked. To freeze baked cookies, arrange them in a single layer on a baking sheet and freeze until solid, about 1-2 hours. Once frozen, transfer them to a freezer-safe airtight container or heavy-duty freezer bag, with parchment paper between layers to prevent sticking. They can be stored in the freezer for up to 2-3 months. Thaw frozen baked cookies at room temperature for a few hours before serving. You can also briefly warm them in a microwave for 10-15 seconds for a just-baked feel, but be careful not to overheat the jam.
To freeze the unbaked cookie dough, form the dough balls and make the indentations (without filling with jam). Place them on a baking sheet and freeze until solid. Then transfer them to a freezer-safe bag or container. When you’re ready to bake, place the frozen dough balls on a prepared baking sheet, fill with jam, and bake as directed, adding a few extra minutes to the baking time (typically 2-4 minutes longer), or until golden brown. You can also freeze the entire dough in a log shape, wrapped tightly in plastic wrap, and then slice and proceed with the recipe from there.
Reheating these cookies isn’t typically necessary as they are best enjoyed at room temperature. However, if you prefer them slightly warm, you can place them on a baking sheet and warm them in a preheated oven at 250°F (120°C) for 5-7 minutes, or until just warmed through. Be mindful not to overheat, as the jam can become very hot and the cookies can dry out. Alternatively, a quick 10-15 second burst in the microwave can gently warm a single cookie.
Frequently Asked Questions
What kind of jam is best for thumbprint cookies?
While raspberry preserves are a classic and delicious choice, you can use almost any thick fruit jam or preserve. Other popular options include apricot, strawberry, blueberry, cherry, or even a fig jam. The key is to use a good quality, thicker jam that won’t spread too much during baking. Avoid very runny jellies, as they might bubble over and make the cookies messy.
Why are my thumbprint cookies cracking around the edges?
Cracking is a common issue with thumbprint cookies, often due to the dough being too cold, too dry, or overmixed. Ensure your butter and cream cheese are at proper room temperature for a pliable dough. If the dough feels dry, you might have added too much flour; try adding a tiny bit of milk (1 teaspoon) to help. Overmixing can develop gluten, making the dough less flexible and more prone to cracking. Gently pressing the indentation and pinching any small cracks together before baking can also help.
Can I make the dough ahead of time?
Absolutely! This cookie dough is excellent for making ahead. You can prepare the dough, wrap it tightly in plastic wrap, and store it in the refrigerator for up to 3 days. When you’re ready to bake, let the dough sit at room temperature for about 15-20 minutes to soften slightly, then proceed with rolling, indenting, and filling. You can also freeze the dough (as described in the storage section) for up to 2-3 months, which is perfect for holiday baking preparation!
My jam bubbled over during baking, what did I do wrong?
If your jam bubbled over, it’s likely that the indentations were either overfilled or the jam was too thin. When filling, aim for about ½ teaspoon of jam per cookie to leave enough room for it to expand slightly without overflowing. Using a thicker preserve rather than a runny jelly can also help. If you consistently have issues, consider baking the cookies plain and adding the jam to the cooled indentations, perhaps briefly warming them for a minute or two in the oven after filling to set the jam slightly.