Instructions
- Prepare the Pork: If using pork ear, blanch it first. Bring a pot of water to a boil, add the sliced pork ear, and blanch for 5-7 minutes. Drain thoroughly and rinse under cold water to remove any impurities. For the pork belly, you can also blanch it briefly for 2-3 minutes to remove impurities, then drain and rinse. Pat both pork belly and ear very dry with paper towels. This step is crucial for achieving good searing and a clean flavor.
- Caramelize the Sugar: Heat a large, heavy-bottomed pot or Dutch oven over medium heat. Add 1 tablespoon of the cooking oil. Once hot, add the rock sugar or brown sugar. Let it melt and caramelize, stirring occasionally, until it turns into a rich amber color. Be careful not to burn it; this should take about 3-5 minutes.
- Sear the Pork: Immediately add the dried pork belly cubes to the caramelized sugar. Sear the pork on all sides until nicely browned and slightly crispy, about 5-7 minutes. This step builds deep flavor and beautiful color. If using pork ear, add it during the last 2 minutes of searing the belly to get some color as well. Remove the seared pork from the pot and set aside, leaving any rendered fat and remaining caramelized sugar in the pot.
- Sauté Aromatics: Add the remaining 1 tablespoon of cooking oil to the same pot if needed. Reduce the heat to medium-low. Add the minced garlic, sliced ginger, and chopped shallots (or onion). Sauté until fragrant and softened, about 2-3 minutes, stirring constantly to prevent burning.
- Build the Sauce Base: Stir in the dried chili flakes and white pepper. Cook for another 30 seconds until fragrant.
- Deglaze and Add Liquids: Pour in the Shaoxing wine (or dry sherry) and scrape up any browned bits from the bottom of the pot with a wooden spoon. Let it simmer for 1 minute until the alcohol scent cooks off.
- Return Pork and Add Spices: Return the seared pork belly and ear to the pot. Add the light soy sauce and dark soy sauce, stirring to coat all the pork pieces evenly.
- Braise: Add the star anise, cinnamon stick, and bay leaves. Pour in enough hot water or chicken broth to just cover the pork. Bring the liquid to a gentle simmer.
- Slow Cook: Once simmering, reduce the heat to low, cover the pot tightly, and braise for 1.5 to 2 hours, or until the pork belly is fork-tender and almost falling apart. Stir occasionally to prevent sticking and ensure even cooking. If the sauce reduces too much during braising, add a splash more hot water or broth.
- Reduce and Finish: After the pork is tender, remove the lid. Increase the heat to medium-high and simmer uncovered for 15-25 minutes, stirring more frequently, until the sauce has thickened and reduced to a glossy, rich consistency that beautifully coats the pork. Taste and adjust seasoning if necessary; you might want a pinch more sugar or soy sauce depending on your preference. Remove the star anise, cinnamon stick, and bay leaves before serving.
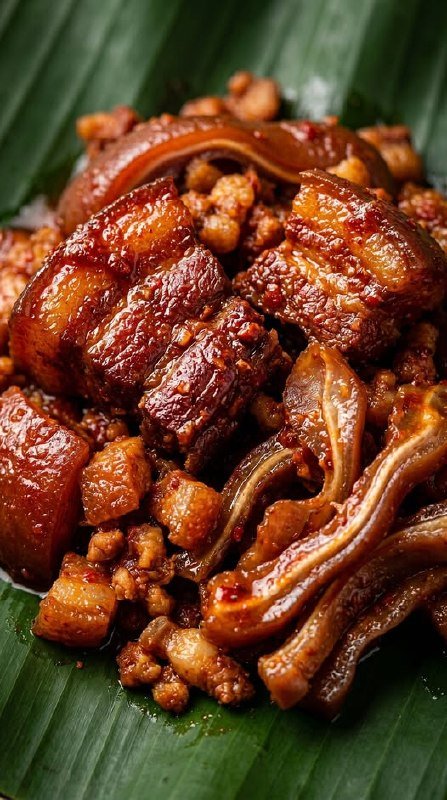
- Serve: Ladle the Pork Yummy onto a serving platter, ideally lined with a banana leaf for an authentic touch. Garnish with fresh sliced chili, chopped green onions, and fresh cilantro. Serve immediately with plenty of hot steamed white rice to soak up every last drop of that incredible sauce.
Cooking Tips and Variations
Achieving Perfect Tenderness: The key to truly melt-in-your-mouth pork belly is patience and a low, slow simmer. Don’t rush the braising process. If you’re short on time, a pressure cooker can significantly reduce cooking time (typically 45-60 minutes on high pressure, followed by natural release). Just be sure to reduce the liquid quantity accordingly. For the best result, aim for a gentle simmer, not a rolling boil, to keep the pork tender and prevent it from becoming tough.
The Glossy Finish: That beautiful, rich sheen on your Pork Yummy comes from a few factors. First, the initial caramelization of the sugar is crucial for color and depth. Second, the reduction of the sauce at the end concentrates the flavors and thickens it naturally. Don’t skip this step! Simmering uncovered on medium-high heat allows the excess liquid to evaporate, leaving you with that desirable, sticky glaze. A touch of dark soy sauce also contributes to the deep, appealing color.
Spice Level Adjustment: The “🔥” in Pork Yummy is flexible! If you prefer a milder dish, start with just 1/2 teaspoon of dried chili flakes or omit them entirely. For a bolder kick, you can increase the chili flakes to 2-3 teaspoons, or even add a few small dried whole chilies along with the aromatics. Fresh sliced chilies for garnish also allow individuals to customize their heat level at the table.
Pork Quality Matters: For the best results, always use good quality, skin-on pork belly. The skin renders down beautifully during braising, contributing to the richness and texture of the dish. If you can’t find pork ear, the dish is still fantastic with just pork belly, but the ear adds a delightful, slightly chewy contrast that is highly recommended.
Serving Suggestions: While Pork Yummy is absolutely divine with plain steamed white rice, don’t limit yourself! It’s also excellent with brown rice, quinoa, or even alongside steamed or stir-fried Asian greens like bok choy or gai lan. For an indulgent treat, serve it with soft, fluffy steamed buns (mantou) for an instant slider experience. The rich sauce is perfect for soaking into any carb.
Make-Ahead & Storage: This dish tastes even better the next day as the flavors have more time to meld and deepen. You can prepare Pork Yummy entirely in advance. Store cooled leftovers in an airtight container in the refrigerator for up to 3-4 days. For longer storage, it freezes wonderfully for up to 2-3 months. Thaw overnight in the refrigerator before reheating.
Variations to Explore: Don’t hesitate to personalize your Pork Yummy!
- Eggs & Tofu: Add hard-boiled eggs (peeled) or pan-fried firm tofu cubes during the last 30 minutes of braising to absorb the delicious sauce.
- Vegetables: Incorporate hearty vegetables like daikon radish, carrots, or even shiitake mushrooms during the last hour of braising.
- Aromatic Boost: Experiment with other whole spices like a pinch of Sichuan peppercorns for a numbing sensation, or a small piece of dried orange peel for a citrusy note.
- Vinegar Tang: A splash of black vinegar (Chinkiang vinegar) added at the very end can provide a lovely counterpoint to the richness, brightening the flavors.
Storage and Reheating
Pork Yummy is one of those magical dishes that often tastes even better the next day, after the flavors have had more time to fully meld and deepen. To store leftovers, allow the dish to cool completely to room temperature. Transfer it to an airtight container and refrigerate for up to 3-4 days. Make sure to include plenty of the luscious sauce with the pork.
For longer storage, Pork Yummy freezes exceptionally well. Portion the cooled dish, including the sauce, into freezer-safe containers or heavy-duty freezer bags. It can be stored in the freezer for up to 2-3 months. When ready to enjoy, thaw overnight in the refrigerator.
To reheat, you have a few options. For best results, gently reheat on the stovetop over medium-low heat. If the sauce has thickened too much, you can add a splash of water or broth to loosen it up. Stir occasionally until the pork is heated through. You can also microwave individual portions in a microwave-safe dish, heating in 1-2 minute intervals and stirring in between, until hot. Be careful not to overheat, as this can dry out the pork. The goal is to bring it back to a warm, simmering state where the pork is tender and the sauce is glossy once more.
Frequently Asked Questions
What kind of pork is best for Pork Yummy?
For the most authentic and delicious Pork Yummy, skin-on pork belly is highly recommended. The layers of meat, fat, and skin render beautifully during the slow braising process, resulting in incredibly tender pork and a rich, glossy sauce. If you can find it, pork ear adds a fantastic chewy and slightly crunchy textural contrast that elevates the dish, but it’s optional.
Can I make Pork Yummy less spicy?
Absolutely! The “🔥” in Pork Yummy is entirely customizable. You can easily adjust the spice level by reducing the amount of dried chili flakes used in the recipe, or by omitting them altogether if you prefer no heat. If you enjoy a very mild warmth, you can add just a tiny pinch of chili flakes. Fresh sliced chilies can also be added as a garnish to allow individuals to control their own spice level at the table.
Why is my sauce not glossy or thick enough?
A glossy, thick sauce is a hallmark of great braised pork. If your sauce isn’t reaching that desired consistency, it’s likely due to insufficient reduction. After the pork is tender, make sure to remove the lid and increase the heat to medium-high. Allow the sauce to simmer uncovered for an additional 15-25 minutes, stirring occasionally. This allows excess liquid to evaporate, concentrating the flavors and naturally thickening the sauce. The caramelized sugar also plays a role in creating that beautiful sheen, so ensure you caramelize it properly at the beginning.
Can I use a slow cooker or pressure cooker for this recipe?
Yes, both a slow cooker and pressure cooker are excellent alternatives for braising Pork Yummy, especially if you’re looking to save time or prefer a hands-off approach. For a slow cooker, follow the searing and aromatic steps in the pot, then transfer everything to the slow cooker and cook on low for 6-8 hours or on high for 3-4 hours, until the pork is tender. You may still need to reduce the sauce on the stovetop afterward if it’s too thin. For a pressure cooker, follow the initial steps, then cook on high pressure for 45-60 minutes, followed by a natural release. Again, finish by reducing the sauce to your desired thickness and glossiness.