Instructions
- Preheat your oven to 350°F (175°C). Grease and flour a 9×13 inch baking pan, or line with parchment paper for easier removal.
- Prepare the Crust: In a large bowl, combine the yellow cake mix, 1 large egg, and 1/2 cup melted butter. Mix with a spoon or electric mixer on low speed until just combined and a thick, dough-like consistency forms. Do not overmix.
- Press the cake mix mixture evenly into the bottom of the prepared 9×13 inch baking pan. Use your fingers or the back of a spoon to ensure an even layer that covers the entire bottom of the pan.
- Prepare the Filling: In another large bowl, using an electric mixer, beat the softened cream cheese until smooth and creamy, about 1-2 minutes.
- Add the 2 large eggs one at a time, beating well after each addition until fully incorporated.
- Stir in the vanilla extract and the remaining 1/2 cup melted butter. Mix until well combined.
- Gradually add the powdered sugar to the cream cheese mixture, beating on low speed until most of the sugar is incorporated, then increase speed to medium and beat until the mixture is smooth and lump-free. Add a pinch of salt and mix briefly to combine. The filling will be thick and pourable.
- Carefully pour the cream cheese filling evenly over the cake mix crust in the baking pan. Use a spatula to gently spread the filling to the edges.
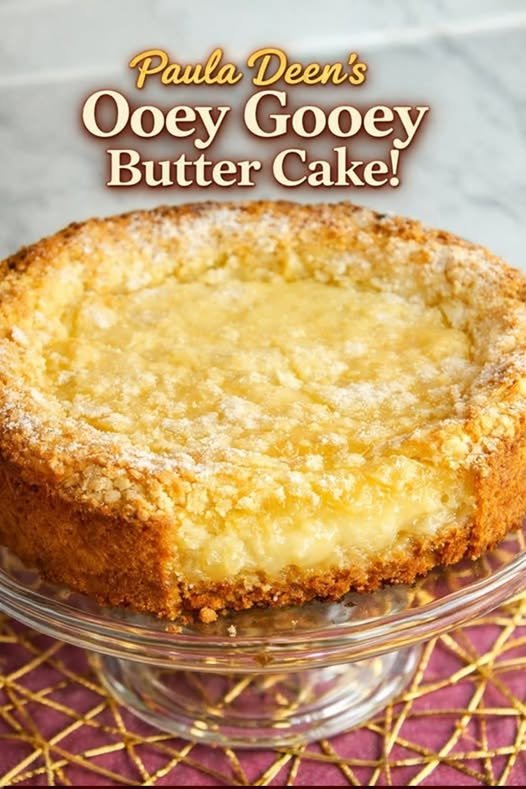
- Bake for 40-50 minutes, or until the edges are golden brown and the center is set but still has a slight “jiggle” when gently shaken. The top may appear slightly golden and a thin crust may form. Remember, you want it to be gooey, so don’t overbake!
- Remove the cake from the oven and let it cool completely in the pan on a wire rack. This is crucial for the cake to set properly and achieve its signature gooey texture.
- Once completely cooled, dust generously with additional powdered sugar before slicing and serving.
Cooking Tips and Variations
To ensure your Paula Deen’s Ooey Gooey Butter Cake is nothing short of perfection, here are some essential tips and exciting variations to try. First and foremost, always make sure your cream cheese is truly softened to room temperature. This is key for achieving a smooth, lump-free filling. If your cream cheese is cold, it will be difficult to beat into a creamy consistency, and you might end up with small lumps in your filling, which detracts from that signature gooey mouthfeel. You can speed up the softening process by cutting the cream cheese into smaller cubes and letting it sit on the counter for about 30 minutes, or by carefully microwaving it for 10-15 seconds at a time until soft but not melted. Another crucial tip is to use room temperature eggs as well. Room temperature eggs emulsify better with the other ingredients, leading to a more homogenous and smoother batter. This is a general rule in baking that improves the texture of almost any cake or baked good.
When it comes to mixing the crust, be mindful not to overmix. The goal is just to combine the ingredients until a dough forms. Overmixing can develop too much gluten in the cake mix, leading to a tougher crust rather than the tender, slightly chewy base we’re aiming for. For the filling, beat the cream cheese thoroughly before adding other ingredients. This creates a light and airy base for the filling. When adding the powdered sugar, do so gradually to avoid a cloud of sugar dust in your kitchen and to ensure it incorporates smoothly without clumping. Start on low speed until the sugar is mostly mixed in, then increase the speed to medium. The baking time is also critical. You’re looking for a cake that is set around the edges and slightly golden, but the center should still have a noticeable “jiggle” when you gently shake the pan. This jiggle is your indicator of that perfect gooey center. If you bake it until it’s completely firm, you’ll lose the “ooey gooey” magic. Err on the side of underbaking rather than overbaking for this particular dessert.
Cooling is another step not to rush. While it’s tempting to dive into this deliciousness warm, allowing the cake to cool completely in the pan allows the filling to fully set and achieve its proper texture. If you cut into it too soon, the gooey center might be too runny, and the slices won’t hold their shape as well. Patience is a virtue, especially when it comes to this cake! For easy removal and clean slices, you can line your baking pan with parchment paper, leaving an overhang on the sides. This creates “handles” to lift the cooled cake out of the pan before cutting.
Now, for some exciting variations! While the classic recipe is divine, you can certainly put your own spin on it. For a different flavor profile, consider adding a teaspoon of almond extract or lemon extract to the filling along with the vanilla. Lemon zest can also brighten up the flavor profile beautifully. If you’re a chocolate lover, you could try using a chocolate cake mix for the crust and adding a tablespoon of unsweetened cocoa powder to the filling for a double chocolate gooey butter cake. Swirling in some melted caramel or a spoon of fruit preserves (like raspberry or apricot) into the filling before baking can add another layer of flavor and visual appeal. For a seasonal twist, consider adding a teaspoon of pumpkin pie spice to the filling in the fall, or a touch of peppermint extract around the holidays. You could also sprinkle some chopped nuts (pecans or walnuts would be excellent) over the filling before baking for added texture and flavor. Another popular variation is to add a layer of fresh berries (like blueberries or raspberries) on top of the crust before pouring the filling, or even folding them gently into the filling itself. Just remember that adding fruit might increase the moisture content, so keep an eye on the baking time.
No matter how you choose to make it, remember that the heart of this cake is its rich, sweet, and undeniably gooey nature. So, embrace the butter, savor the sweetness, and enjoy every single delightful bite of this Southern classic!
Storage and Reheating
Proper storage is essential to maintain the delightful texture and freshness of your Paula Deen’s Ooey Gooey Butter Cake. Once the cake has completely cooled, it should be stored in an airtight container at room temperature for up to 2-3 days. If your kitchen is particularly warm, or if you want to extend its shelf life, you can store it in the refrigerator for up to 5-7 days. When refrigerating, ensure it’s tightly covered to prevent it from drying out or absorbing odors from other foods. The cake’s texture will firm up slightly when chilled, especially the gooey center, but it will still be delicious.
For longer storage, this cake freezes beautifully. Once completely cooled, cut the cake into individual servings. Wrap each slice tightly in plastic wrap, then place the wrapped slices in a freezer-safe airtight container or a heavy-duty freezer bag. The cake can be frozen for up to 2-3 months. Thaw frozen slices in the refrigerator overnight or at room temperature for a few hours before serving.
When it comes to reheating, you have a few options depending on your preference. If you prefer the cake at room temperature, simply let refrigerated slices sit out for 30-60 minutes before serving. To enjoy a warm, extra-gooey experience, you can gently reheat individual slices. For the microwave, place a slice on a microwave-safe plate and heat on medium power for 15-30 seconds, or until just warmed through and the center becomes soft and gooey again. Be careful not to overheat, as this can make the cake dry. Alternatively, you can reheat slices in a preheated oven at 250°F (120°C) for about 5-10 minutes, or until warm and soft. This method can help maintain a slightly crisp crust. Whether warm or at room temperature, it’s always a good idea to dust with a fresh sprinkle of powdered sugar just before serving for that perfect finishing touch.
Frequently Asked Questions
What makes this cake “ooey gooey”?
The “ooey gooey” texture comes from the unique combination of the simple cake mix crust and the rich, custardy cream cheese and butter filling. The filling is designed to remain soft and almost liquid-like even after baking and cooling, providing that signature melt-in-your-mouth, sticky sweetness that defines the cake.
Can I make this cake ahead of time?
Absolutely! This cake is an excellent make-ahead dessert. In fact, many people find that the flavors meld and the texture sets even better after a day or two. Store it covered at room temperature for up to 2-3 days, or in the refrigerator for up to a week. It’s perfect for parties or events where you want to minimize last-minute prep.
Why did my cake turn out dry or not gooey enough?
The most common reason for a dry or less gooey cake is overbaking. The center of the cake should still have a slight “jiggle” when you remove it from the oven. If you bake it until it’s completely firm, the filling will lose its signature gooey texture. Ensure your oven temperature is accurate and start checking for doneness at the lower end of the recommended baking time. Also, using room temperature ingredients for the filling helps create a smoother, more consistent batter that bakes evenly.
Can I use a different type of cake mix for the crust?
Yes, while yellow cake mix is the classic choice and provides a neutral base that lets the gooey filling shine, you can certainly experiment! A chocolate cake mix would create a delicious chocolate-lovers version, or a white cake mix could also work well. Just ensure it’s a standard 18.25-ounce (or similar size) box of cake mix.