Instructions
- Prepare the Ribs: Begin by preparing your pork spare ribs. Lay each rack meat-side down on a clean cutting board. Locate the thin, white membrane on the bone side of the ribs. Using a small knife or the tip of a spoon, gently lift a corner of the membrane. Once you have a good grip, use a paper towel to firmly pull the membrane off the entire rack. This step is crucial for tender, fall-off-the-bone ribs. If the membrane tears, simply pick up another piece and continue pulling. Trim any excess fatty pieces if desired.
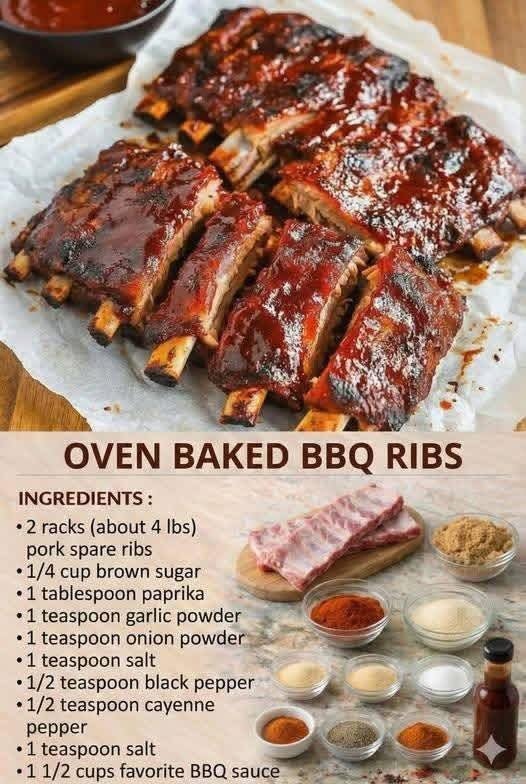
- Make the Dry Rub: In a small bowl, combine the brown sugar, paprika, garlic powder, onion powder, salt, black pepper, and cayenne pepper. Mix thoroughly until all ingredients are well combined and there are no clumps of brown sugar. This is your flavorful dry rub.
- Apply the Dry Rub: Generously sprinkle the dry rub over both sides of the pork ribs, ensuring they are completely coated. Don’t be shy – really massage the rub into the meat. For best results and deeper flavor, you can prepare the ribs up to 24 hours in advance, wrap them tightly in plastic wrap, and refrigerate. If cooking immediately, proceed to the next step.
- Preheat Oven & Prepare for Baking: Preheat your oven to 275°F (135°C). Tear off two large sheets of heavy-duty aluminum foil for each rack of ribs. Lay one sheet down, then place the second sheet perpendicularly on top to create a sturdy, cross-shaped wrap. Place one rack of rubbed ribs meat-side up in the center of the foil.
- First Bake (Wrapped): Tightly wrap the ribs in the foil, sealing all edges to create a secure packet. Ensure no steam can escape, as this is key for tenderizing the meat. Place the wrapped ribs on a large baking sheet, ensuring they are not overlapping if you are cooking two racks.
- Bake Low and Slow: Bake the wrapped ribs in the preheated oven for 2 hours and 30 minutes to 3 hours. The exact time may vary slightly depending on your oven and the thickness of the ribs. The goal is for the ribs to be very tender, almost falling apart when gently prodded.
- Unwrap and Sauce: Carefully remove the baking sheet from the oven. Open the foil packets, being cautious of the hot steam that will escape. Drain any accumulated liquid from the foil (this liquid can be discarded or saved for another use if desired). Generously brush both sides of the ribs with about half of your favorite BBQ sauce.
- Second Bake (Unwrapped & Sauced): Return the sauced ribs, still on the baking sheet and unwrapped, to the oven. Increase the oven temperature to 350°F (175°C). Continue to bake for another 20-30 minutes, or until the BBQ sauce has caramelized and become slightly sticky. For an even deeper glaze and a touch of char, you can brush with the remaining BBQ sauce during the last 10-15 minutes of this baking step. Keep a close eye on them to prevent burning.
- Rest and Serve: Once the ribs are beautifully glazed and caramelized, remove them from the oven. It’s crucial to let the ribs rest for 10-15 minutes before slicing. This allows the juices to redistribute throughout the meat, ensuring maximum tenderness and flavor. After resting, slice the ribs between the bones into individual portions or sections. Serve immediately with extra BBQ sauce on the side for dipping.
Cooking Tips and Variations
Achieving perfect oven-baked ribs is all about technique and a little bit of patience. Here are some tips to ensure your ribs are always a hit, along with ideas to customize them to your liking.
The Membrane is Your Arch-Nemesis: Seriously, do not skip removing the membrane from the back of the ribs. This thin, silverskin layer becomes tough and chewy when cooked, preventing the meat from becoming truly tender. If you’re struggling to grip it, use a paper towel to get a better hold. It will make a world of difference in the final texture.
Don’t Be Shy with the Rub: A good dry rub is the foundation of flavor for these ribs. Apply it generously and massage it into every crevice of the meat. The longer the rub sits on the ribs (ideally overnight in the fridge), the more flavor it imparts. This “dry brining” helps season the meat deeply.
Low and Slow is the Way to Go: The initial low temperature (275°F/135°C) and long cooking time are essential for breaking down the tough connective tissues in the ribs, resulting in that coveted fall-off-the-bone tenderness. Resist the urge to crank up the heat; patience will be rewarded.
Tight Foil Wrap for Tenderness: Wrapping the ribs tightly in heavy-duty aluminum foil creates a steamy environment that essentially braises the ribs, keeping them incredibly moist and tender. Ensure there are no gaps for steam to escape. Using two layers of foil, crisscrossed, provides extra security.
The Glaze is the Game Changer: After the initial tenderizing bake, unwrapping and increasing the temperature allows the BBQ sauce to caramelize and create that sticky, glossy, irresistible crust. Don’t rush this step, and feel free to baste multiple times to build layers of flavor.
Broiler for Extra Char (Optional): If you like a slightly charred, extra-sticky finish, you can place the sauced ribs under a preheated broiler for 2-3 minutes at the very end. Watch them like a hawk, as BBQ sauce burns quickly! This adds a beautiful smoky depth without needing a grill.
Resting is Non-Negotiable: Just like with any cooked meat, resting the ribs after they come out of the oven allows the juices to redistribute. This means more tender, more flavorful, and less dry ribs. Tent them loosely with foil and let them sit for at least 10-15 minutes before slicing.
Variations:
- Spice It Up: For those who love heat, increase the amount of cayenne pepper in the dry rub, or add a pinch of red pepper flakes. You can also choose a spicier BBQ sauce.
- Smoky Flavor Boost: Add 1/2 teaspoon of liquid smoke to your dry rub or mix it into your BBQ sauce for an extra smoky flavor, mimicking a grill without leaving the kitchen.
- Herbaceous Ribs: Incorporate dried herbs like thyme, oregano, or rosemary into your dry rub for a different aromatic profile.
- Mustard Base: Before applying the dry rub, spread a thin layer of yellow mustard or Dijon mustard over the ribs. It acts as a binder for the rub and adds a subtle tangy background flavor that pairs wonderfully with pork.
- Beer or Apple Cider Braise: For an even more moist and flavorful rib, pour about 1/2 cup of beer (lager or stout works well) or apple cider into the foil packet before sealing and baking. This adds another layer of moisture and flavor during the initial slow cook.
- Homemade BBQ Sauce: Elevate your ribs by using a homemade BBQ sauce. There are countless recipes available, allowing you to customize the sweetness, tanginess, and spice level.
- Fruity Twist: Add a tablespoon of apple cider vinegar or a squeeze of orange juice to your BBQ sauce for a brighter, fruitier note.
Storage and Reheating
These Oven Baked BBQ Ribs are so delicious, you might not have any leftovers! But if you do, here’s how to properly store and reheat them to maintain their deliciousness.
Storage:
- Cool Completely: Allow the cooked ribs to cool down to room temperature before storing. This prevents condensation from forming and keeps the ribs from becoming soggy.
- Airtight Container: Once cool, transfer the ribs (either whole racks or sliced portions) to an airtight container. You can also wrap them tightly in plastic wrap and then again in aluminum foil for extra protection against freezer burn.
- Refrigeration: Stored properly in the refrigerator, the ribs will remain fresh and delicious for 3-4 days.
- Freezing: For longer storage, freeze the ribs. Wrap individual portions or whole racks tightly in plastic wrap, then an additional layer of aluminum foil, and place them in a freezer-safe bag or container. They can be frozen for up to 2-3 months. Thaw frozen ribs in the refrigerator overnight before reheating.
Reheating:
The key to reheating ribs is to do it gently to prevent them from drying out. You want to warm them through without overcooking them.
- Oven Method (Recommended for best results):
- Preheat your oven to 250-300°F (120-150°C).
- Place the ribs in an oven-safe dish or baking sheet. If they seem a bit dry, you can add a tablespoon or two of water, apple juice, or extra BBQ sauce to the bottom of the dish to create some steam.
- Cover the dish tightly with aluminum foil.
- Reheat for 20-30 minutes, or until the ribs are heated through. If reheating from frozen (after thawing), this might take 45-60 minutes.
- For a refreshed glaze, remove the foil during the last 5-10 minutes of reheating and brush with a little fresh BBQ sauce.
- Microwave Method (Quickest, but can affect texture):
- Cut the ribs into individual portions.
- Place a few pieces on a microwave-safe plate.
- Add a tablespoon of water or a drizzle of BBQ sauce over the ribs.
- Cover the plate with a microwave-safe lid or damp paper towel.
- Microwave on medium power for 1-2 minutes, checking frequently, until heated through. Be careful not to overcook, as this can make them tough.
- Grill Method (For a smoky refresh):
- Preheat your grill to medium-low heat.
- Wrap the ribs loosely in aluminum foil to prevent drying out.
- Place the wrapped ribs on the grill and heat for 10-15 minutes, turning occasionally, until warmed through.
- For a smoky finish, unwrap the ribs for the last few minutes and brush with fresh BBQ sauce, letting it caramelize slightly over direct heat.
Frequently Asked Questions
How do I know when the ribs are perfectly tender?
The best way to tell if your oven-baked ribs are perfectly tender is by performing the “bend test.” Gently pick up one end of a rib with tongs. If the meat easily bends and cracks, looking like it’s about to break, and the bone starts to pull away from the meat, they are done. Another good indicator is if the meat has pulled back from the ends of the bones by about half an inch. They should feel incredibly soft when gently prodded.
Can I prepare the ribs ahead of time?
Absolutely! Preparing ribs ahead of time is a fantastic way to deepen their flavor and make meal prep easier. You can apply the dry rub up to 24 hours in advance and keep the ribs tightly wrapped in plastic wrap in the refrigerator. For an even more “make-ahead” approach, you can complete the initial low-and-slow baking step (wrapped in foil) and then refrigerate the cooked ribs for up to 3 days. When you’re ready to serve, simply pull them out, unwrap, sauce, and finish baking at the higher temperature until heated through and caramelized.
What kind of BBQ sauce should I use?
The beauty of this recipe is that it’s highly adaptable to your personal taste! We recommend using your favorite store-bought BBQ sauce, whether you prefer a sweet and smoky, tangy and vinegary, or spicy and bold variety. Experiment with different brands and flavor profiles to find what you love best. Alternatively, if you’re feeling ambitious, a homemade BBQ sauce can elevate the ribs to another level, allowing you to perfectly tailor the sweetness, acidity, and spice.
My ribs are tough; what went wrong?
If your ribs turned out tough, the most common culprit is insufficient cooking time. Ribs require a long, slow cooking process to break down the tough connective tissues and fat. Ensure you cook them for the full recommended time (2.5 to 3 hours at 275°F/135°C) and perform the “bend test” to confirm tenderness before increasing the temperature and saucing. Another possibility is not removing the membrane from the back of the ribs, which can create a chewy barrier.