Instructions
- In a large mixing bowl, combine the flour, active dry yeast, and salt. If using instant yeast, you can add it directly with the flour and salt. If using active dry yeast, you may prefer to proof it first: combine the yeast with the lukewarm water in a separate small bowl, let it sit for 5-10 minutes until foamy, then add to the dry ingredients.
- Pour the lukewarm water into the dry ingredients. Using a wooden spoon or a sturdy spatula, mix until all the flour is incorporated and a shaggy, sticky dough forms. There’s no need to knead; just ensure there are no dry pockets of flour remaining.
- Cover the bowl tightly with plastic wrap or a damp kitchen towel. Place the bowl in a warm spot in your kitchen (away from drafts) and let it rise for at least 8 hours, or preferably 12-18 hours. The longer the rise, the more flavor will develop. The dough should at least double in size and be bubbly on the surface.
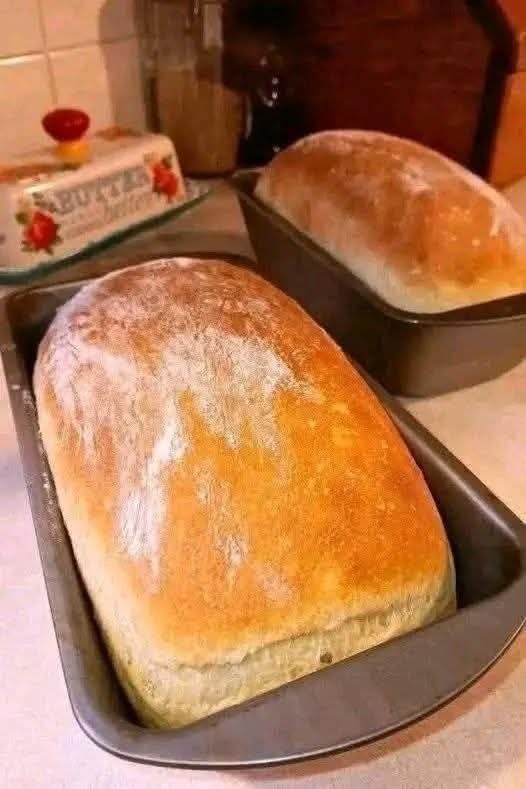
- Once the dough has risen, lightly grease a standard 9×5-inch loaf pan with olive oil or cooking spray. If you don’t have a loaf pan, you can bake it free-form on a baking sheet, but the pan helps maintain its shape.
- Lightly flour a clean work surface. Gently scrape the dough out of the bowl onto the floured surface. Avoid deflating it too much.
- With lightly floured hands, gently shape the dough into a rough rectangle, approximately the length of your loaf pan. Fold the two shorter ends towards the middle, then fold the longer sides over, creating a somewhat taut, loaf-like shape. Don’t overwork the dough.
- Carefully transfer the shaped dough into the prepared loaf pan, seam-side down.
- Cover the loaf pan loosely with plastic wrap or a clean kitchen towel. Let the dough rise again for another 30-60 minutes in a warm spot. It should puff up noticeably, almost reaching the top of the pan.
- While the dough is doing its second rise, preheat your oven to 425°F (220°C). If you have a baking stone or steel, place it in the oven to preheat as well.
- Once the oven is preheated and the dough has risen, optionally, you can lightly dust the top of the loaf with a little extra flour for a rustic look.
- Place the loaf pan into the preheated oven. If you’re using a baking stone/steel, place the pan directly on it. For a crispier crust, you can place a pan of hot water on the bottom rack of the oven for the first 15-20 minutes to create steam.
- Bake for 30-40 minutes, or until the crust is deeply golden brown and the internal temperature reaches 200-210°F (93-99°C) when measured with an instant-read thermometer. If the top is browning too quickly, you can loosely tent it with aluminum foil.
- Once baked, carefully remove the loaf from the oven. Immediately turn it out onto a wire rack to cool completely. This is crucial for preventing the bottom from becoming soggy and ensuring a good texture.
- Allow the bread to cool for at least 1-2 hours before slicing. Slicing too early can result in a gummy texture.
Cooking Tips and Variations
For the best results, always measure your flour by weight (using a kitchen scale) rather than volume. A cup of flour can vary significantly in weight depending on how it’s scooped, which can drastically alter the dough’s consistency. If you don’t have a scale, lightly spoon flour into your measuring cup and level it off with a straight edge, rather than packing it down.
The water temperature is important for activating the yeast. It should feel warm to the touch, like a baby’s bath, but not hot. Too hot water will kill the yeast, while too cold water will slow down its activity significantly. Aim for around 105-115°F (40-46°C).
Don’t rush the first rise! The long fermentation is what develops the gluten structure in this no-knead bread, giving it its characteristic chewiness and flavor. A cooler kitchen might require a longer rise, while a warmer one might shorten it. Look for the dough to be visibly bubbly and at least doubled in size.
To create a steamier oven environment for a crispier crust, place a shallow metal pan on the bottom rack of your oven while preheating. Just before you put the bread in, carefully pour about 1 cup of hot water into the preheated pan. Be cautious of the steam! This helps prevent the crust from hardening too quickly, allowing the bread to expand fully.
Feel free to experiment with different types of flour! You can substitute up to 1 cup of the all-purpose flour with whole wheat flour for a heartier loaf, or even rye flour for a more robust flavor. Just be aware that whole grain flours absorb more water, so you might need to add a tablespoon or two more water to achieve the right dough consistency.
Additions for flavor: For an herby loaf, mix in 1-2 tablespoons of dried herbs like rosemary, thyme, or oregano with the dry ingredients. For a savory twist, incorporate ½ cup of shredded cheese (cheddar, Parmesan), or 2-3 cloves of minced garlic. A handful of seeds like sunflower, pumpkin, or sesame can be added to the dough or sprinkled on top before baking for extra texture and nutrition.
For a round artisan-style loaf, instead of shaping it into a loaf pan, after the first rise, gently shape the dough into a taut ball on a floured surface. Place it seam-side up in a floured proofing basket (banneton) or a bowl lined with a floured kitchen towel for the second rise. Then, transfer it to a preheated Dutch oven or baking stone for baking, optionally scoring the top with a sharp knife before baking. Baking temperature and time might need slight adjustments (often higher initial temperature, then reduced).
Storage and Reheating
Once completely cooled, homemade bread is best stored at room temperature. For short-term storage (1-2 days), keep the loaf in a paper bag to maintain crust crispness. This allows air circulation and prevents the crust from becoming soft. Avoid storing it in an airtight plastic bag at room temperature for too long, as this can trap moisture and lead to a soft crust and potentially mold.
For longer storage (up to 4-5 days), you can store the bread in a bread box or a clean, dry kitchen towel wrapped around it. If you prefer a softer crust, an airtight plastic bag or container will keep it fresh for a few days, though the crust will soften.
To extend its shelf life even further, this bread freezes beautifully. Once the loaf is completely cool, slice it or keep it whole, then wrap it tightly in plastic wrap, followed by a layer of aluminum foil. Place it in a freezer-safe bag. It can be stored in the freezer for up to 3 months. When you’re ready to enjoy it, simply remove it from the freezer. If frozen whole, thaw it at room temperature for several hours or overnight. If frozen in slices, you can pop them directly into a toaster or toaster oven.
To reheat a whole loaf and bring back its fresh-baked quality, preheat your oven to 350°F (175°C). Lightly mist the bread with water (or wrap it loosely in foil) and bake for 10-15 minutes, or until warmed through and the crust is crisp again. For individual slices, a toaster or toaster oven works perfectly. You can also briefly warm slices in a dry skillet on medium heat until lightly toasted.
Frequently Asked Questions
Why is my dough not rising?
Several factors can cause dough not to rise. The most common reasons are inactive yeast (check the expiration date), water that is too hot (which kills the yeast) or too cold (which slows it down significantly), or an environment that is too cold for proofing. Ensure your yeast is fresh, your water is lukewarm, and your dough is in a warm, draft-free spot for its long first rise.
Can I use whole wheat flour for this recipe?
Yes, you can! You can substitute up to 1 cup of the all-purpose flour with whole wheat flour for a heartier, more nutritious loaf. Keep in mind that whole wheat flour absorbs more liquid, so you might need to add an extra tablespoon or two of water to achieve the same shaggy, sticky dough consistency. Using 100% whole wheat flour will result in a denser loaf with a different texture.
My bread is dense and heavy. What went wrong?
A dense loaf can be a result of several issues. It might be that the dough didn’t rise enough during either the first or second proofing, meaning the yeast didn’t produce enough gas to create an open crumb structure. This could be due to inactive yeast or an unsuitable proofing environment. Another common cause is overworking the dough during shaping, which can deflate it too much. Finally, slicing the bread before it has fully cooled can also make it appear gummy and dense.