Instructions
- Prepare the Onions: Preheat your oven to 375°F (190°C). Carefully slice off the very top and bottom ends of each large yellow onion, just enough to create a stable base and top. Peel the outer layers. Using a paring knife, carefully cut around the inside of each onion, leaving about a 1/2-inch wall. Scoop out the inner layers of the onion, leaving 2-3 sturdy outer layers to form a “bowl.” Roughly chop the scooped-out onion pieces and set aside; you’ll use some for the filling.
- Pre-Cook the Onions: Place the hollowed-out onion shells in a baking dish. Drizzle lightly with olive oil and season with a pinch of salt and pepper. Cover the dish tightly with aluminum foil and bake for 25-30 minutes, or until the onions are slightly tender but still hold their shape. This step helps them cook evenly and become sweet. Remove from oven and set aside.
- Cook the Bacon: While the onions pre-cook, cook the 8 slices of thick-cut bacon in a large skillet over medium heat until crispy. Remove the bacon, drain on paper towels, and once cooled, crumble into small pieces. Reserve 1 tablespoon of bacon fat in the skillet.
- Prepare the Cheeseburger Filling: In the same skillet with the reserved bacon fat, add the 1 lb ground beef. Break it up with a spoon and cook over medium-high heat until browned. Drain any excess grease. Add 1/2 cup of the chopped reserved onion pieces (from hollowing out the onions), the garlic powder, onion powder, smoked paprika, 1/2 teaspoon salt, and 1/4 teaspoon black pepper. Cook for another 5-7 minutes, until the chopped onion softens. Stir in the 1/2 cup beef broth and let it simmer for 2-3 minutes until most of the liquid has evaporated. Remove from heat and set aside.
- Make the Mac and Cheese: Bring a large pot of salted water to a boil. Add the 8 oz elbow macaroni and cook according to package directions until al dente. Drain well and set aside.
- Prepare the Cheese Sauce: In a separate medium saucepan, melt the 2 tablespoons unsalted butter over medium heat. Whisk in the 2 tablespoons all-purpose flour and cook for 1-2 minutes, stirring constantly, to create a roux. Gradually whisk in the 1 1/2 cups whole milk until smooth. Bring to a gentle simmer, whisking frequently, until the sauce thickens (about 3-5 minutes). Remove from heat. Stir in the 1 teaspoon Dijon mustard, 1/2 teaspoon Worcestershire sauce, and 1/4 teaspoon cayenne pepper (if using). Add the 1 1/2 cups shredded sharp cheddar cheese and 1/2 cup shredded Monterey Jack cheese, stirring until completely melted and smooth.
- Combine Mac and Cheese Filling: Add the cooked and drained elbow macaroni to the cheese sauce. Stir gently until all the pasta is evenly coated.
- Assemble the Onion Bombs: Carefully remove the pre-cooked onion shells from the baking dish. If there’s any liquid in the bottom of the onion, gently drain it. Place the onion shells back into the baking dish (you might need to use a muffin tin or crumpled foil to keep them upright if they’re wobbly).
- Layer the Filling: Spoon a layer of the cheeseburger mixture into the bottom of each onion shell. Follow with a layer of the mac and cheese. Sprinkle a generous amount of crumbled bacon over the mac and cheese. Repeat the layers: cheeseburger, mac and cheese, and bacon, until the onions are generously filled and mounded slightly at the top. You want to make sure each onion is packed full of deliciousness.
- Final Bake: Return the baking dish with the stuffed onion bombs to the 375°F (190°C) oven. Bake for another 25-35 minutes, or until the onions are very tender, the filling is heated through and bubbly, and the top is lightly golden. If desired, you can sprinkle a little extra cheese on top for the last 10 minutes of baking.
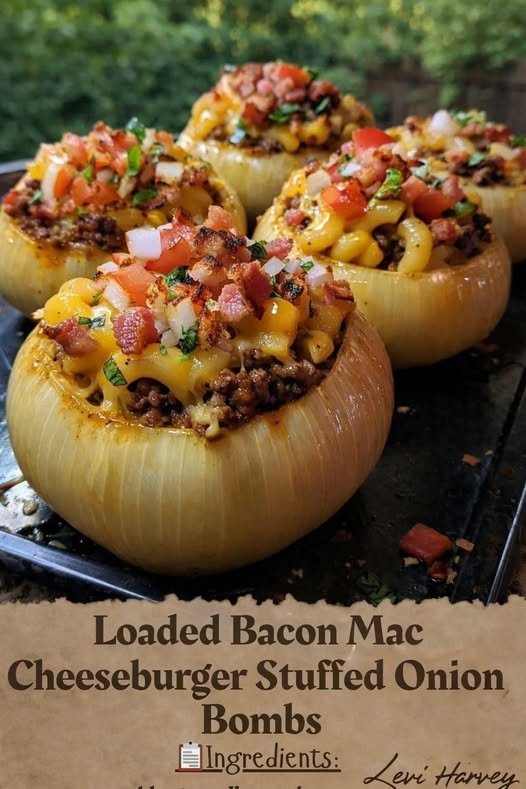
- Garnish and Serve: Carefully remove the onion bombs from the oven. Let them rest for 5 minutes before serving. Garnish generously with the diced ripe tomatoes, chopped green onions, and fresh parsley before serving.
Cooking Tips and Variations
Achieving the perfect Loaded Bacon Mac Cheeseburger Stuffed Onion Bomb is a delightful culinary endeavor, and a few insider tips can elevate your results from great to absolutely legendary. First and foremost, onion selection is crucial. Opt for large, firm yellow or Spanish onions. Their size provides ample space for stuffing, and their slightly sweet flavor mellows beautifully during roasting. Avoid red onions for this recipe, as their stronger flavor can overpower the delicate balance of the filling. When hollowing out the onions, take your time; you want to leave enough outer layers to create a sturdy “bowl” that won’t collapse during baking. A small, sharp paring knife and a spoon work wonders here.
Pre-cooking the onions is a non-negotiable step. It ensures the onion itself becomes tender and sweet, rather than remaining firm and pungent, and it prevents the filling from overcooking while the onion is still raw. If you’re short on time, you can also microwave the hollowed onions for 5-7 minutes until slightly softened instead of baking them. Just be sure to drain any accumulated liquid. For the ultimate cheesy top, consider broiling the onion bombs for the last 2-3 minutes of cooking, or after they come out of the oven, until the cheese is beautifully golden and bubbly. Keep a close eye on them to prevent burning!
When it comes to variations, the sky’s the limit! For a different flavor profile, try swapping out the ground beef for ground turkey or even a spicy Italian sausage. If you’re feeling adventurous, mix in some finely diced jalapeños or a dash of hot sauce into the cheeseburger filling for an extra kick. The cheese sauce is also highly adaptable; experiment with different combinations like smoked gouda, pepper jack, or a sharp provolone for unique flavor twists. For a vegetarian version, use a plant-based ground meat substitute and vegetable broth in place of beef broth. You could also add finely diced mushrooms or bell peppers to the filling for added vegetables and texture. Don’t be afraid to play with toppings either; a drizzle of barbecue sauce, a dollop of sour cream, or even some crispy fried onions can add another layer of flavor and visual appeal. These onion bombs are hearty enough to be a meal on their own, but if you’re looking for a side, a simple green salad with a light vinaigrette or a fresh coleslaw would offer a refreshing contrast.
Storage and Reheating
Proper storage and reheating are key to enjoying your Loaded Bacon Mac Cheeseburger Stuffed Onion Bombs even after the initial feast. If you have leftovers (which is a rare but wonderful occurrence!), allow the onion bombs to cool completely to room temperature before storing. This prevents condensation from building up, which can make the onion and filling soggy. Once cooled, transfer them to an airtight container. You can store individual onion bombs or place them side-by-side if they fit without crushing. They will keep well in the refrigerator for up to 3-4 days.
For reheating, the oven is your best friend to maintain that delightful texture and prevent sogginess. Preheat your oven to 350°F (175°C). Place the leftover onion bombs in an oven-safe dish, cover loosely with aluminum foil to prevent the top from drying out or burning, and bake for 20-30 minutes, or until heated through to the center. The foil helps to steam them slightly, ensuring the onion remains tender and the filling gets warm without drying out. If you prefer a crispier top, remove the foil for the last 5-10 minutes of reheating. While the microwave can be used for a quicker reheat, be aware that it might make the onion a bit softer and the bacon less crispy. If using the microwave, heat in 1-2 minute intervals until warmed through, checking often.
These onion bombs can also be frozen, making them an excellent make-ahead meal option. To freeze, allow the cooked and cooled onion bombs to freeze individually on a baking sheet for a few hours until solid. Then, transfer them to a freezer-safe bag or container, removing as much air as possible. They can be stored in the freezer for up to 2-3 months. When ready to enjoy, thaw them overnight in the refrigerator, then reheat in the oven as described above. You might need to add an extra 10-15 minutes to the baking time if reheating from a partially frozen state.
Frequently Asked Questions
Can I prepare the filling ahead of time?
Absolutely! You can prepare both the cheeseburger mixture and the mac and cheese up to 2 days in advance. Store them separately in airtight containers in the refrigerator. When you’re ready to assemble, gently reheat the fillings on the stovetop or in the microwave to make them more pliable for stuffing. You can also pre-cook and crumble the bacon ahead of time. This makes assembly on the day of serving much quicker and easier.
What if my onions are too wobbly to stand upright in the baking dish?
This is a common issue with round onions! There are a couple of easy solutions. You can use a muffin tin, placing each onion bomb into a muffin cup to keep it stable. Alternatively, you can create “nests” of crumpled aluminum foil in your baking dish to support the onions and prevent them from tipping over during baking. Ensuring you create a flat, stable base by slicing off enough of the bottom of the onion also helps significantly.
Can I make these on the grill instead of in the oven?
Yes, you can! Grilling adds a wonderful smoky flavor. After pre-cooking the hollowed onions, assemble the bombs as instructed. Wrap each stuffed onion bomb securely in heavy-duty aluminum foil. Place them on a preheated grill over indirect medium heat (around 350-375°F or 175-190°C) for 45-60 minutes, or until the onions are very tender and the filling is heated through. You might not get the same golden-brown top as in the oven, but the smoky char will be a fantastic trade-off.