Instructions
- Prepare the Ribs: Begin by preparing your pork spare ribs. Lay the ribs meat-side down on a cutting board. Locate the thin, silvery membrane on the bone side of the ribs. To remove it, use a small knife to gently lift a corner of the membrane. Once you have a good grip, use a paper towel to firmly pull the membrane off in one continuous strip. This step is crucial for tender ribs. If you struggle, your butcher can often do this for you. Pat the ribs dry thoroughly with paper towels.
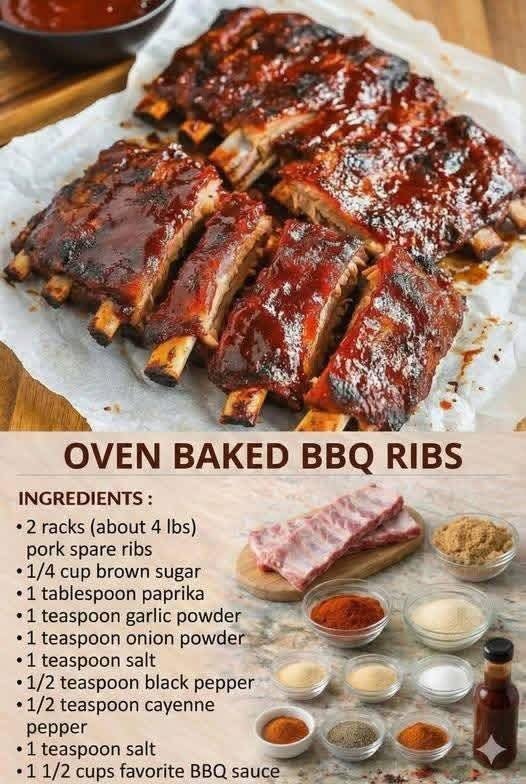
- Make the Dry Rub: In a small bowl, combine the brown sugar, smoked paprika, garlic powder, onion powder, kosher salt, black pepper, and cayenne pepper (if using). Mix well until all ingredients are evenly distributed.
- Apply the Dry Rub: Generously sprinkle the dry rub mixture all over both sides of the ribs, pressing it gently into the meat to ensure it adheres. Make sure to cover every surface. For best results and deeper flavor, you can cover the seasoned ribs with plastic wrap and refrigerate them for at least 1 hour, or preferably 4-6 hours, or even overnight. If you’re short on time, you can proceed directly to baking.
- Preheat the Oven: Preheat your oven to 275°F (135°C). This low temperature is key to achieving tender, fall-off-the-bone ribs.
- Prepare for Baking: Tear off two large pieces of heavy-duty aluminum foil for each rack of ribs. Lay one piece of foil on a baking sheet, then place a rack of ribs on top, meat-side up. Place the second piece of foil over the ribs, then crimp the edges of both foil pieces together tightly to create a sealed packet. Ensure there are no gaps for steam to escape. Alternatively, you can place the ribs in a large baking dish and cover it very tightly with heavy-duty aluminum foil.
- Slow Bake: Place the foil-wrapped ribs on the preheated oven’s middle rack. Bake for 2 1/2 to 3 hours. The exact time will depend on the thickness of your ribs. The ribs are ready when they are very tender, and the meat has pulled back from the ends of the bones.
- Apply BBQ Sauce and Finish: Carefully remove the ribs from the oven. Increase the oven temperature to 400°F (200°C). Carefully open the foil packets (watch out for hot steam!). Transfer the ribs to a clean baking sheet, discarding any accumulated liquid in the foil. Generously brush both sides of the ribs with your favorite BBQ sauce.
- Caramelize the Sauce: Return the sauced ribs to the 400°F (200°C) oven. Bake for another 15-20 minutes, or until the BBQ sauce is bubbly, slightly caramelized, and sticky. Keep a close eye on them to prevent burning. For an even deeper caramelization and a bit of char, you can carefully broil the ribs for 2-5 minutes at the very end, watching them constantly to prevent burning.
- Rest and Serve: Once the ribs are beautifully glazed, remove them from the oven. Let them rest for 5-10 minutes before slicing them between the bones. This allows the juices to redistribute, ensuring maximum tenderness and flavor.
- Garnish and Enjoy: Garnish with chopped fresh parsley or cilantro, if desired, and serve immediately with your favorite BBQ sides.
Cooking Tips and Variations
Tips for Best Results:
- Don’t Skip the Membrane: Removing the membrane from the back of the ribs is not just a suggestion, it’s essential for truly tender ribs. If left on, it becomes tough and chewy, preventing the meat from falling off the bone.
- Dry Ribs for Better Rub Adhesion: Always pat your ribs thoroughly dry with paper towels before applying the dry rub. This helps the seasoning stick better and creates a more flavorful crust.
- Wrap Tightly: Sealing the ribs tightly in foil or covering the baking dish very securely traps steam, which is crucial for the “low and slow” cooking process that tenderizes the meat. Any leaks will result in drier ribs.
- Low and Slow is Key: Resist the urge to crank up the oven temperature to speed things up. The 275°F (135°C) temperature allows the connective tissues in the ribs to slowly break down, resulting in that coveted fall-off-the-bone texture.
- Adjust Baking Time: Ribs vary in thickness. Thicker racks might need closer to 3 hours, while thinner ones might be done in 2 1/2 hours. The best way to tell they’re done is when the meat has visibly pulled back from the bone ends.
- Let Them Rest: Just like with any cooked meat, allowing the ribs to rest for 5-10 minutes after they come out of the oven helps the juices redistribute throughout the meat, making them even more tender and moist.
- Watch During Broiling: If you opt to broil for extra caramelization, stay vigilant! Broilers can go from perfect to burnt in a matter of seconds.
Recipe Variations:
- Smokier Flavor: For a more pronounced smoky taste without a smoker, add 1/2 to 1 teaspoon of liquid smoke to your dry rub mixture. You can also add a few drops to your BBQ sauce.
- Spicier Ribs: Increase the amount of cayenne pepper in the dry rub to 1 teaspoon or more, or add a pinch of red pepper flakes to your BBQ sauce. You could also finish with a drizzle of hot honey!
- Different Rubs: Feel free to experiment with different dry rub combinations. Try adding brown mustard powder, cumin, or even a touch of espresso powder for depth.
- Honey BBQ Ribs: Use a honey-flavored BBQ sauce or whisk in 2 tablespoons of honey into your regular BBQ sauce before glazing the ribs.
- Garlic Parmesan Ribs: After baking and before the final glaze, brush the ribs with melted butter mixed with minced garlic, then sprinkle with grated Parmesan cheese before applying a light layer of BBQ sauce and caramelizing.
- Different Cuts of Ribs: This recipe works beautifully with other cuts of pork ribs, such as baby back ribs. Baby back ribs are typically smaller and leaner, so they may require a slightly shorter baking time (around 2 to 2.5 hours).
- Apple Cider Vinegar Spritz: Some pitmasters like to spritz their ribs with apple cider vinegar during the long cook for extra moisture and tang. You can do this by opening the foil packet halfway through baking and lightly spritzing the ribs before resealing.
Storage and Reheating
Storing Leftovers:
Once your delicious oven-baked BBQ ribs have cooled completely, you can store them in an airtight container or wrap them tightly in aluminum foil. Place them in the refrigerator for up to 3-4 days. For longer storage, you can freeze the cooked ribs. Wrap individual portions tightly in plastic wrap, then in aluminum foil, and place them in a freezer-safe bag or container. They will keep well in the freezer for up to 2-3 months. Thaw frozen ribs overnight in the refrigerator before reheating.
Reheating Properly:
Reheating ribs correctly is crucial to maintain their tenderness and prevent them from drying out. Avoid microwaving if possible, as it can make them tough.
- Oven Method (Recommended): This is the best method for retaining moisture and flavor. Preheat your oven to 250-300°F (120-150°C). Place the leftover ribs in an oven-safe dish with a splash of water or broth (about 1/4 cup) at the bottom. Cover the dish tightly with aluminum foil. Heat for 20-30 minutes, or until heated through. If you like a fresh glaze, you can brush them with a little more BBQ sauce for the last 5-10 minutes, uncovered.
- Grill Method: If you have a grill, this is a great way to reheat and get a bit of smoky flavor. Preheat your grill to medium-low heat. Wrap the ribs loosely in foil with a tablespoon of water or apple juice. Place them on the indirect heat side of the grill and heat for 10-15 minutes, turning occasionally, until warmed through. You can then unwrap them and grill directly over low heat for a few minutes to crisp up the sauce, if desired.
- Air Fryer Method: For smaller portions, an air fryer can work. Preheat your air fryer to 300°F (150°C). Place the ribs in the air fryer basket in a single layer (you may need to cut them). Cook for 8-12 minutes, flipping halfway, until heated through. You can brush with extra BBQ sauce for the last few minutes.
Frequently Asked Questions
Do I have to remove the membrane from the ribs?
Yes, absolutely! Removing the tough, silvery membrane from the back of the ribs is a critical step. If you leave it on, it will become chewy and prevent the dry rub and sauce from fully penetrating the meat, resulting in less tender and flavorful ribs that don’t “fall off the bone.”
Can I prepare the ribs ahead of time?
You can definitely prepare the ribs in advance! After applying the dry rub, you can cover them tightly with plastic wrap and refrigerate them for up to 24 hours. This allows the flavors of the rub to penetrate deeper into the meat, enhancing the overall taste. When you’re ready to cook, simply proceed with the baking instructions.
My ribs aren’t falling off the bone, what went wrong?
The most common reasons for ribs not being fall-off-the-bone tender are not cooking them long enough or not cooking them at a low enough temperature. Ensure your oven temperature is accurate and that you’ve baked them for the full 2 1/2 to 3 hours, or until the meat visibly pulls away from the bones. Also, make sure the foil packet was sealed tightly to trap all the moisture.
What are the best sides to serve with these BBQ ribs?
Classic BBQ sides perfectly complement these oven-baked ribs. Some popular choices include creamy coleslaw, sweet corn on the cob, fluffy potato salad, savory baked beans, cornbread, or a fresh green salad. Don’t forget some extra napkins!