Instructions
Prepare the Danish Dough:
- In a small bowl, combine the warm milk, 1 teaspoon of granulated sugar, and yeast. Stir gently and let it sit for 5-10 minutes until foamy, indicating the yeast is active.
- In a large mixing bowl, whisk together the 3 ½ cups of flour and salt.
- Add the remaining ¼ cup of granulated sugar and the egg to the yeast mixture, stirring to combine.
- Pour the wet ingredients into the dry ingredients. Mix with a wooden spoon or your hands until a shaggy dough forms. Do not overmix.
- Turn the dough out onto a lightly floured surface and knead for about 2 minutes, just until it comes together. It will be slightly sticky. Form it into a rough rectangle.
- Wrap the dough tightly in plastic wrap and refrigerate for at least 30 minutes.
- While the dough chills, prepare the butter for lamination. Place the cold butter cubes between two sheets of parchment paper. Using a rolling pin, pound and roll the butter into an 8×8-inch square. Return the butter square to the refrigerator.
Laminate the Dough (Folding Process):
- On a lightly floured surface, roll the chilled dough into a 16×8-inch rectangle.
- Place the cold butter square on one half of the dough, leaving a ½-inch border around the edges. Fold the other half of the dough over the butter, sealing the edges firmly to enclose the butter completely.
- Turn the dough 90 degrees (so the folded seam is on your left or right). Gently roll the dough into a 18×8-inch rectangle.
- Perform a “letter fold”: Fold one-third of the dough over the middle, then fold the remaining third over that. You should have three layers of dough.
- Wrap the folded dough tightly in plastic wrap and refrigerate for 30 minutes.
- Repeat steps 3-5 two more times, for a total of three folds and three chilling periods. After the final fold and chill, the dough should be firm and elastic. This lamination process creates the flaky layers.
Prepare the Cheesecake Filling:
- In a medium bowl, beat the softened cream cheese and ½ cup granulated sugar with an electric mixer until smooth and creamy, about 2-3 minutes.
- Beat in the egg yolk and vanilla extract until just combined. Do not overmix.
- Gently fold in the well-drained crushed pineapple and 1 tablespoon of all-purpose flour until evenly distributed. The flour helps to stabilize the filling.
- Cover the filling and refrigerate until ready to use.
Assemble the Danishes:
- Preheat your oven to 400°F (200°C). Line two large baking sheets with parchment paper.
- On a lightly floured surface, roll out the chilled Danish dough into a large 16×12-inch rectangle, about ¼-inch thick.
- Trim the edges to create a neat rectangle. Cut the dough into 12 equal squares (about 4×4 inches each).
- For each square, make four diagonal cuts, starting about 1 inch from each corner and cutting towards the center, stopping about 1 inch from the center. Do not cut all the way through the center.
- Place about 1 ½ tablespoons of the cheesecake filling in the center of each dough square.
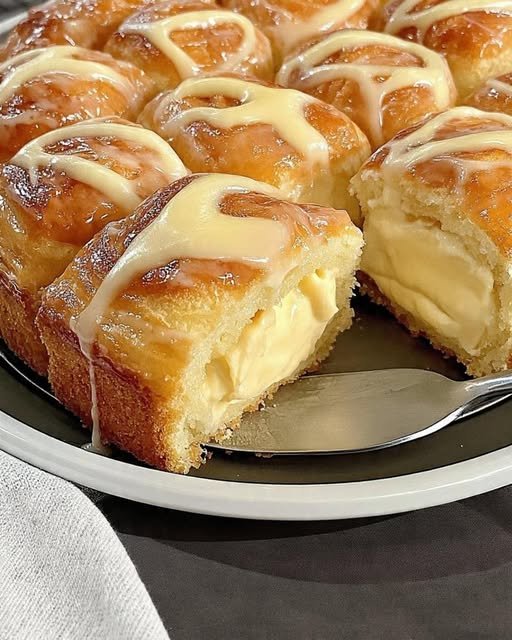
- To shape the Danish: Take one corner of the dough and fold it over the filling towards the opposite cut. Take the next corner clockwise and fold it over, overlapping the previous corner slightly and pressing gently to adhere. Continue with the remaining two corners, creating a pinwheel or square shape with the filling peeking through the center. Alternatively, you can simply bring two opposite corners to meet in the center over the filling, then bring the other two opposite corners to meet in the center, forming a square or slightly star-like shape.
- Carefully transfer the shaped Danishes to the prepared baking sheets, leaving about 2 inches between them.
Bake the Danishes:
- Bake for 15-20 minutes, or until the Danish pastry is golden brown and puffed, and the cheesecake filling is set.
- Once baked, remove the Danishes from the oven and let them cool on the baking sheets for 5 minutes before transferring them to a wire rack to cool completely.
Prepare and Apply the Glaze:
- While the Danishes cool, prepare the glaze. In a small bowl, whisk together the powdered sugar, 2 tablespoons of milk (or pineapple juice), and vanilla extract (if using) until smooth. Add more milk, ½ teaspoon at a time, if a thinner consistency is desired.
- Once the Danishes are completely cool, drizzle the glaze generously over them.
- If desired, sprinkle with toasted shredded coconut or garnish with fresh pineapple chunks before the glaze sets.
Cooking Tips and Variations
Keep it Cold: The absolute key to flaky Danish pastry is keeping the butter and dough cold throughout the lamination process. If at any point the butter seems to be melting or the dough becomes too sticky to work with, don’t hesitate to pop it back in the refrigerator for 10-15 minutes. Cold ingredients prevent the butter from incorporating into the dough, which is essential for those distinct, airy layers.
Don’t Overmix the Filling: When making the cheesecake filling, mix only until the ingredients are just combined and smooth. Overmixing can incorporate too much air, which can cause the filling to puff up excessively in the oven and then sink or crack as it cools. A gentle hand yields the creamiest results.
Thoroughly Drain Pineapple: Whether using canned or fresh crushed pineapple, ensure it is very well-drained. Excess moisture will make the cheesecake filling too wet, potentially leading to a soggy pastry or a filling that doesn’t set properly. Press it firmly in a fine-mesh sieve or paper towels.
Perfecting the Glaze: The consistency of the glaze is crucial. It should be thick enough to cling to the Danish but thin enough to drizzle smoothly. Start with less liquid and gradually add more, stirring well after each addition, until you achieve the desired drizzling consistency. For an extra tropical kick, use pineapple juice instead of milk in the glaze.
Shaping Alternatives: If the pinwheel shape seems daunting, you can simplify. After cutting the dough into squares, simply place the filling in the center and fold two opposite corners over the filling, pressing them together. Or, for a classic square Danish, fold all four corners towards the center, overlapping slightly, and press down to seal, leaving a small opening in the center for the filling to show through.
Tropical Fruit Variations: While pineapple is classic for the “Hawaiian” theme, feel free to experiment with other tropical fruits. Mango chunks (well-drained), passion fruit pulp (mixed into the cream cheese), or even a combination of pineapple and coconut flakes in the filling can add delightful variations. Just ensure any fruit additions are not overly watery.
Spice It Up: A pinch of ground ginger or a tiny dash of nutmeg in the cheesecake filling can complement the pineapple beautifully, adding another layer of warmth and complexity. A small amount of lime zest can also brighten the flavors.
Mini Danishes: For smaller, bite-sized treats, roll the dough slightly thinner and cut it into smaller squares (e.g., 3×3 inches). Adjust baking time accordingly, likely reducing it by a few minutes.
Storage and Reheating
Storage at Room Temperature: If you plan to consume the Hawaiian Cheesecake Danishes within 1-2 days, you can store them at room temperature in an airtight container. However, due to the cream cheese filling, refrigeration is generally recommended for optimal freshness and safety, especially in warmer climates.
Refrigeration: For longer storage, place the cooled Danishes in a single layer in an airtight container or wrap individual Danishes tightly in plastic wrap. They will keep well in the refrigerator for up to 3-4 days. The pastry may lose some of its crispness when refrigerated, but the flavor will remain excellent.
Freezing: Yes, you can freeze Hawaiian Cheesecake Danishes! To freeze, place the completely cooled (and preferably unglazed) Danishes on a baking sheet and freeze until solid. Once frozen, transfer them to a freezer-safe bag or airtight container, separating layers with parchment paper to prevent sticking. They can be stored in the freezer for up to 1 month. Glazed Danishes can also be frozen, but the glaze might become slightly sticky or watery upon thawing.
Reheating from Refrigerated: To restore some of the flaky texture, you can gently reheat refrigerated Danishes. Place them on a baking sheet in a preheated oven at 300°F (150°C) for about 5-10 minutes, or until warmed through. Alternatively, a toaster oven works well for individual Danishes. Be careful not to overheat, as this can dry them out.
Reheating from Frozen: If reheating from frozen, it’s best to thaw them overnight in the refrigerator first. Then, follow the instructions for reheating from refrigerated. If reheating directly from frozen, place them on a baking sheet in a 325°F (160°C) oven for 15-20 minutes, or until warmed through. Keep an eye on them to prevent burning.
Serving: These Danishes are delicious served slightly warm or at room temperature. A quick zap in the microwave for 15-20 seconds can warm an individual Danish beautifully without drying it out too much. They pair wonderfully with a cup of coffee or tea for breakfast or a light dessert.
Frequently Asked Questions
What makes this Danish “Hawaiian” beyond the pineapple?
While pineapple is the most prominent “Hawaiian” element, the term also evokes a sense of tropical warmth, sweetness, and often a bright, refreshing flavor profile. Beyond the fruit itself, the inspiration comes from the desire to infuse a traditional European pastry with a sunny, island-inspired twist. Sometimes, a hint of coconut (either in the filling or as a garnish) further enhances this tropical feel, and the vibrant, golden hue of the baked pastry itself can even contribute to the overall tropical aesthetic.
Can I use puff pastry instead of making Danish dough from scratch?
Yes, you absolutely can use store-bought puff pastry for a quicker version! While it won’t have the exact same nuanced texture as traditional Danish dough (which is richer due to the egg and yeast), it will still yield a wonderfully flaky and delicious result. Thaw the puff pastry according to package directions, then roll it out to a similar thickness and cut into squares before filling and shaping. Adjust baking times as needed, usually slightly less than scratch-made dough.
My cheesecake filling cracked during baking. What went wrong?
Cracked cheesecake filling is a common issue and usually indicates overbaking or overmixing. Overmixing incorporates too much air, which expands during baking and then collapses, causing cracks. Overbaking dries out the filling, leading to cracking. Ensure you’re mixing the cream cheese filling only until just combined and smooth. Also, watch the Danishes carefully in the oven; the filling should be set but still have a slight jiggle in the very center when you gently shake the baking sheet. Remove them promptly once they reach this point.
Can I prepare the Danish dough ahead of time?
Yes, Danish dough is excellent for making ahead! After the final fold and chill, you can wrap the dough very tightly in plastic wrap and store it in the refrigerator for up to 2 days. Alternatively, you can freeze the unbaked dough for up to 1 month. If freezing, thaw it overnight in the refrigerator before rolling, filling, and baking. This makes it perfect for preparing in stages for a special occasion or weekend brunch.