Instructions
- Preheat your oven to 400°F (200°C). If you plan to broil at the end, ensure your broiler element is clean.
- Prepare the scallops: If your scallops have a small, tough side muscle attached, gently pull it off and discard it. This muscle can be chewy. Thoroughly pat the scallops dry with paper towels. This is a crucial step to ensure they brown nicely; excess moisture will steam them instead.
- Make the garlic butter sauce: In a small microwave-safe bowl or saucepan, melt the butter. Add the minced garlic to the melted butter and stir. Heat for another 30 seconds or until the garlic is fragrant but not browned. Remove from heat and stir in the fresh lemon juice, chopped parsley, salt, and black pepper. If using, add red pepper flakes.
- Arrange the scallops: Place the dried scallops in a single layer in a shallow baking dish (such as a gratin dish or oven-safe skillet). Ensure they are not overcrowded, leaving a little space between each scallop for even cooking.
- Pour the garlic butter: Drizzle the prepared garlic butter sauce evenly over the scallops. Ensure each scallop is coated. If using Parmesan cheese, sprinkle it over the scallops now.
- Bake the scallops: Transfer the baking dish to the preheated oven and bake for 8-12 minutes. The exact cooking time will depend on the size of your scallops and your oven.
- Broil for a golden finish (optional but recommended): For a beautiful golden-brown crust, switch your oven to broiler mode (high setting) during the last 1-2 minutes of cooking. Keep a very close eye on them, as scallops can go from perfectly golden to burnt very quickly under the broiler.
- Check for doneness: Scallops are cooked when they turn opaque throughout and are slightly firm to the touch. They should still be tender and juicy. Be careful not to overcook them, as they will become rubbery.
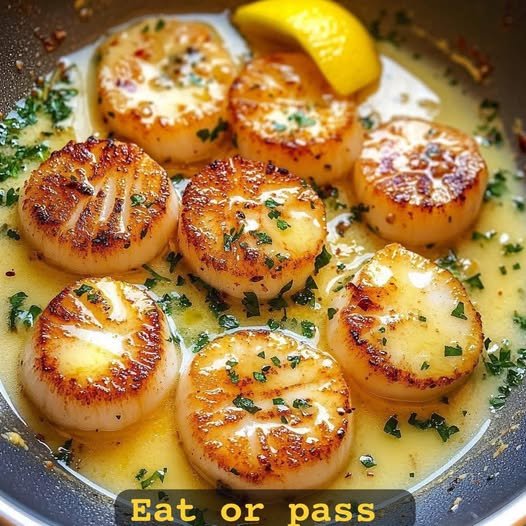
- Garnish and serve: Remove the scallops from the oven. Garnish generously with additional fresh chopped parsley. Serve immediately with fresh lemon wedges for squeezing over the top.
Cooking Tips and Variations
Choosing Your Scallops: Always opt for “dry-packed” sea scallops if possible. Wet-packed scallops are soaked in a phosphate solution, which makes them absorb water, increasing their weight and releasing excess liquid during cooking, preventing a good sear or browning. Dry-packed scallops are naturally sweet and sear beautifully. Look for scallops that are firm, translucent, and have a fresh, slightly sweet smell.
The Importance of Patting Dry: We can’t stress this enough! Moisture is the enemy of browning. Take the extra minute to thoroughly pat each scallop dry with paper towels before seasoning and baking. This helps create that desirable slightly caramelized crust.
Don’t Overcrowd the Pan: When arranging scallops in your baking dish, ensure they are in a single layer with a little space between each one. Overcrowding will lower the temperature of the dish and cause the scallops to steam rather than bake and brown evenly. If you have a large batch, cook them in two smaller dishes or in batches.
Perfect Doneness: Scallops cook quickly. They are done when they turn opaque throughout and are just firm to the touch, with a slightly translucent center if you prefer them very tender. Overcooked scallops become tough and rubbery, so watch them closely. A good rule of thumb is 1-2 minutes per side if searing, or 8-12 minutes total when baking, depending on size.
Enhancing the Garlic Butter:
- Lemon Zest: For an even brighter citrus note, add 1 teaspoon of fresh lemon zest to your garlic butter sauce along with the juice.
- Herb Variations: While parsley is classic, consider experimenting with other fresh herbs like chives or dill for a different flavor profile.
- Spicy Kick: A pinch of red pepper flakes adds a subtle warmth and balances the richness of the butter.
- Wine Reduction: For an extra layer of flavor, after melting the butter and sautéing the garlic, you could deglaze the pan with 1-2 tablespoons of dry white wine (like Sauvignon Blanc or Pinot Grigio) before adding the lemon juice and herbs. Let it reduce slightly.
Broiling for a Finish: The broiler is your friend for achieving a beautiful golden-brown crust. However, it works very quickly. Keep a watchful eye on your scallops during this step to prevent burning. Position your oven rack about 6 inches from the broiler element.
Serving Suggestions:
- As an Appetizer: Serve with small forks or toothpicks, perhaps on a bed of mixed greens.
- Light Main Course: Pair with a simple green salad dressed with a vinaigrette.
- With Pasta: Toss the baked scallops and their delicious garlic butter sauce with linguine or fettuccine for a quick and elegant pasta dish.
- With Rice: Serve over fluffy white rice, brown rice, or even a risotto for a more substantial meal.
- Crusty Bread: Don’t let any of that amazing garlic butter go to waste! Serve with crusty bread to sop up every last drop.
- Vegetable Sides: Roasted asparagus, steamed green beans, or sautéed spinach make excellent companions.
Wine Pairing: These scallops pair beautifully with crisp, dry white wines. Think Sauvignon Blanc, Pinot Grigio, Grüner Veltliner, or an unoaked Chardonnay. The acidity of the wine will cut through the richness of the butter and complement the sweetness of the scallops.
Adding Parmesan: A light sprinkle of freshly grated Parmesan cheese over the scallops before baking can add a delightful salty, umami note and create an even more golden crust. Don’t overdo it, as you still want the scallop flavor to shine.
Storage and Reheating
Storage:
Leftover Garlic Butter Baked Scallops should be stored in an airtight container in the refrigerator within two hours of cooking. They will keep well for up to 1-2 days. While safe to eat, scallops are best enjoyed fresh, as their texture can change upon reheating.
Reheating:
Reheating scallops can be tricky, as they are prone to becoming tough and rubbery if overcooked. The goal is to warm them through gently without further cooking.
- Oven/Toaster Oven: The best method for reheating. Preheat your oven or toaster oven to 275-300°F (135-150°C). Place the scallops in a single layer in an oven-safe dish. Add a tiny splash of water or chicken broth to the bottom of the dish to create some steam and prevent drying. Cover loosely with foil. Heat for 5-10 minutes, or until just warmed through. Avoid high heat.
- Stovetop: You can gently reheat scallops in a non-stick skillet over low heat. Add a tiny bit of butter or olive oil to the pan. Place the scallops in a single layer and cover. Heat for 2-4 minutes, flipping once, until just warmed. Again, be very careful not to let them cook further.
- Microwave (Least Recommended): While possible, the microwave is the least ideal method as it can easily rubberize scallops. If you must use it, place scallops in a microwave-safe dish, cover, and heat on low power (50%) in 15-20 second increments, checking after each burst, until just warm.
Remember, the texture of reheated scallops will likely not be as tender as freshly cooked ones, but these methods will help preserve their quality as much as possible.
Frequently Asked Questions
What’s the difference between “wet-packed” and “dry-packed” scallops?
This is a crucial distinction for cooking. “Wet-packed” scallops are preserved in a solution of water and sodium tripolyphosphate, which makes them absorb water. This increases their weight (meaning you pay more for water) and causes them to release excess liquid when cooked, making it almost impossible to get a good sear or browning. “Dry-packed” scallops, on the other hand, are natural, untreated, and typically only contain their natural moisture. They caramelize beautifully and have a sweeter flavor. Always opt for dry-packed if you can find them.
Can I use frozen scallops for this recipe?
Yes, you can use frozen scallops, but proper thawing is essential. Thaw them overnight in the refrigerator. Once thawed, it’s even more critical to thoroughly pat them dry with paper towels, as frozen scallops tend to release more moisture than fresh ones. Ensure they are completely dry before proceeding with the recipe to achieve the best texture and browning.
How do I know when scallops are perfectly cooked?
Perfectly cooked scallops will be opaque throughout, with a slightly golden crust if seared or broiled. When gently pressed, they should feel firm but still yield slightly. The center should no longer be translucent. Be careful not to overcook them, as scallops can go from tender to tough and rubbery in a matter of seconds. When in doubt, it’s better to undercook them slightly, as they will continue to cook a tiny bit from residual heat after being removed from the oven.
Can I prepare the garlic butter sauce ahead of time?
Absolutely! You can prepare the garlic butter sauce a few hours in advance. Simply melt the butter, add the garlic, lemon juice, parsley, salt, and pepper, and stir everything together. Store it in an airtight container at room temperature if using within a few hours, or refrigerate it if preparing further in advance. You may need to gently re-warm it before drizzling over the scallops, as the butter will solidify in the fridge.