Instructions
General No-Churn Base Preparation:
- In a large, chilled bowl, pour the very cold heavy whipping cream. Using an electric mixer (stand mixer with whisk attachment or handheld mixer), whip the cream on medium-high speed until stiff peaks form. This means when you lift the beaters, the cream holds its shape firmly. Be careful not to over-whip, or it will turn grainy.
- In a separate medium bowl, combine the sweetened condensed milk with the specific flavorings for your chosen ice cream (e.g., vanilla extract, pumpkin puree, reduced Dr Pepper, etc.). Mix well until thoroughly combined.
- Gently fold about one-third of the whipped cream into the condensed milk mixture. This lightens the condensed milk base.
- Add the remaining whipped cream to the mixture and gently fold until just combined. Be careful not to deflate the whipped cream, as its airiness is crucial for the no-churn texture. The mixture should be light, airy, and uniform.
- Pour the ice cream mixture into a freezer-safe loaf pan (or other airtight container). Cover tightly with plastic wrap, pressing it directly onto the surface of the ice cream to prevent ice crystals, then cover with foil or an airtight lid.
- Freeze for at least 6 hours, or preferably overnight, until firm.
Specific Flavor Instructions:
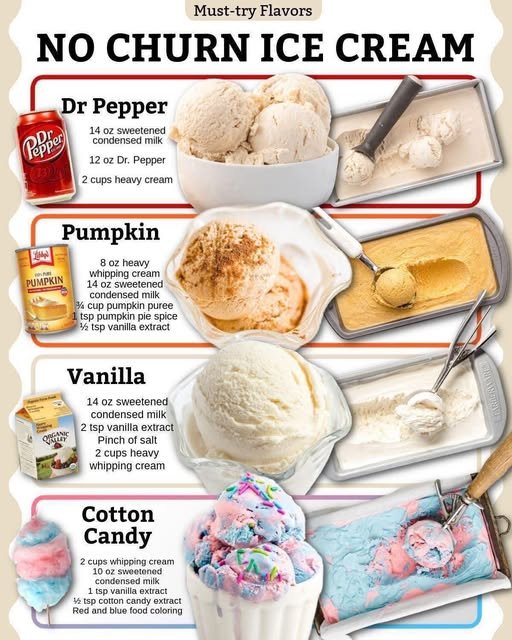
Dr Pepper Ice Cream:
- Pour 12 ounces of Dr. Pepper soda into a small saucepan. Bring to a gentle simmer over medium heat and cook, stirring occasionally, until the liquid has reduced to about ¼ to ⅓ cup of thick, syrupy consistency. This will take about 15-20 minutes. Be careful not to burn it. Let cool completely.
- Follow the general no-churn base preparation steps. In step 2, combine the 14 ounces of sweetened condensed milk with the cooled Dr. Pepper syrup. Mix well.
- Proceed with folding in the whipped cream and freezing as per general instructions.
Cozy Pumpkin Ice Cream:
- Follow the general no-churn base preparation steps. In step 2, combine the 14 ounces of sweetened condensed milk with the pumpkin puree, pumpkin pie spice, and vanilla extract. Mix well until smooth and evenly colored.
- Proceed with folding in the whipped cream and freezing as per general instructions.
Classic Vanilla Ice Cream:
- Follow the general no-churn base preparation steps. In step 2, combine the 14 ounces of sweetened condensed milk with the vanilla extract and a pinch of salt. Mix well. The salt helps to enhance the vanilla flavor.
- Proceed with folding in the whipped cream and freezing as per general instructions.
Whimsical Cotton Candy Ice Cream:
- Follow the general no-churn base preparation steps. In step 2, combine the 10 ounces of sweetened condensed milk with the vanilla extract and cotton candy extract. Mix well.
- Divide the condensed milk mixture into two separate bowls. Add a few drops of red food coloring gel to one bowl and a few drops of blue food coloring gel to the other. Mix each until the color is vibrant and uniform.
- Divide the whipped cream equally into the two colored condensed milk mixtures. Gently fold the whipped cream into each colored mixture separately until just combined.
- Pour alternating spoonfuls of the red and blue ice cream mixtures into the loaf pan, creating swirls. Use a knife or skewer to gently swirl the colors together once they are all in the pan, being careful not to overmix.
- Proceed with covering and freezing as per general instructions. Top with sprinkles after 2-3 hours of freezing, or just before serving.
Cooking Tips and Variations
For the creamiest no-churn ice cream, always start with very cold heavy cream. You can even chill your mixing bowl and whisk attachment in the freezer for 10-15 minutes before whipping. This helps the cream whip up faster and hold its volume better. When folding the whipped cream into the condensed milk mixture, be gentle! The air incorporated into the cream is what gives no-churn ice cream its light, airy texture, so you don’t want to deflate it. Use a spatula and a gentle “cut and fold” motion until just combined, leaving no streaks of unmixed cream.
To prevent ice crystals from forming on the surface of your ice cream, ensure it’s covered tightly with plastic wrap, pressing the wrap directly onto the surface before adding an additional lid or foil. This creates a barrier against air and moisture. For serving, let your ice cream sit out on the counter for 5-10 minutes before scooping. This allows it to soften slightly, making it easier to scoop and giving it a perfectly creamy texture.
The beauty of no-churn ice cream is its endless versatility. For the Classic Vanilla, consider adding mix-ins like chocolate chips, chopped nuts, cookie pieces, or fresh berries during the final folding step. The Pumpkin ice cream would be fantastic with a swirl of caramel sauce or crushed gingersnap cookies. For Dr Pepper, a drizzle of chocolate fudge or even some chopped cherries could be a fun addition. And for Cotton Candy, experiment with different colorful sprinkles, edible glitter, or even a few mini marshmallows. You can also swap out extracts – try almond, peppermint, or even coffee extract for different flavor profiles. The possibilities are truly limitless!
Storage and Reheating
No-churn ice cream, like all homemade ice cream, is best enjoyed within 1-2 weeks for optimal flavor and texture. Store the ice cream in an airtight, freezer-safe container to prevent freezer burn and absorption of freezer odors. A loaf pan covered tightly with plastic wrap and then foil works perfectly. For longer storage, up to one month, transfer the frozen ice cream to a heavy-duty freezer bag, pressing out as much air as possible before sealing and placing it back in the container.
There’s no “reheating” ice cream, of course, but proper thawing is key for the best serving experience. When you’re ready to enjoy a scoop, remove the container from the freezer and let it sit at room temperature for about 5-10 minutes. This brief softening period allows the ice cream to become perfectly scoopable and restores its creamy consistency. If it’s been in the freezer for a very long time, you might need an extra few minutes. Avoid microwaving or rapidly thawing, as this can lead to an icy texture and compromise the overall quality of your delicious homemade treat.
Frequently Asked Questions
What makes no-churn ice cream creamy without an ice cream maker?
The magic lies in two key ingredients: heavy whipping cream and sweetened condensed milk. When heavy cream is whipped to stiff peaks, it incorporates a lot of air, which gives the ice cream its light and airy texture. Sweetened condensed milk, with its high sugar content and thick consistency, helps prevent large ice crystals from forming during freezing, resulting in a smooth, creamy, and scoopable final product without the need for churning.
Can I use milk or half-and-half instead of heavy whipping cream?
Unfortunately, no. Heavy whipping cream is essential for this recipe because it has a high fat content (at least 36%) that allows it to whip up into stiff peaks and hold its volume. Milk or half-and-half do not have enough fat to achieve this, and your ice cream will turn out icy and hard rather than creamy. Stick to heavy whipping cream for the best results!
My ice cream turned out icy. What went wrong?
Icy ice cream is usually due to one of two reasons: either the heavy cream wasn’t whipped enough, or it was over-mixed after combining with the condensed milk. Make sure your heavy cream is whipped to stiff peaks before folding it in. Also, be very gentle when folding the whipped cream into the condensed milk mixture; over-mixing can deflate the air, leading to a denser, icier texture. Ensuring your container is tightly sealed to prevent air exposure during freezing also helps.
How long does no-churn ice cream last in the freezer?
For the best taste and texture, no-churn ice cream is best consumed within 1-2 weeks. It can be stored for up to one month in a very well-sealed, airtight container, but beyond that, it may start to develop freezer burn or lose some of its creamy texture. Always ensure it’s covered tightly to prevent ice crystals and absorption of freezer odors.