Instructions
- Prepare the Cake Pan: Preheat your oven to 350°F (175°C). Line a 10×15-inch jelly roll pan with parchment paper, leaving an overhang on the short sides. Lightly grease the parchment paper.
- Whip Egg Yolks: In a large bowl, beat the egg yolks with 1/4 cup of granulated sugar until light, thick, and pale yellow, about 3-4 minutes. Stir in the vanilla extract and milk.
- Combine Dry Ingredients: In a separate medium bowl, whisk together the cocoa powder, all-purpose flour, baking powder, and salt.
- Fold Dry into Wet: Gradually add the dry ingredients to the egg yolk mixture, folding gently until just combined. Do not overmix.
- Whip Egg Whites: In a very clean, separate large bowl, using an electric mixer with clean beaters, beat the egg whites on medium speed until soft peaks form. Gradually add the remaining 1/4 cup of granulated sugar, increasing speed to high, and beat until stiff, glossy peaks form. Be careful not to overbeat.
- Lighten Batter: Gently fold about one-third of the whipped egg whites into the chocolate batter to lighten it. Then, carefully fold in the remaining egg whites in two additions until no streaks of white remain. Be gentle to maintain the airiness.
- Bake the Cake: Pour the batter evenly into the prepared jelly roll pan, spreading it to the edges with an offset spatula. Bake for 10-12 minutes, or until the cake springs back when lightly touched and the edges are just barely pulling away from the pan. Do not overbake!
- Prepare for Rolling: While the cake is baking, lay a clean kitchen towel (free of lint) on a flat surface and generously dust it with powdered sugar.
- Roll the Cake: As soon as the cake comes out of the oven, immediately invert it onto the powdered sugar-dusted towel. Carefully peel off the parchment paper. Starting from one of the short sides, carefully roll the warm cake and the towel together into a tight log. Place the rolled cake, seam-side down, on a wire rack and let it cool completely to room temperature, about 1-2 hours. This step is crucial to prevent cracking later.
- Make the Cookies and Cream Filling: While the cake cools, prepare the filling. In a large bowl, beat the softened cream cheese and butter together until smooth and creamy, about 2-3 minutes. Gradually add the sifted powdered sugar, vanilla extract, and salt, beating until light and fluffy.
- Whip Heavy Cream (for filling): In a separate cold bowl, whip the 1 cup of cold heavy cream until stiff peaks form. Gently fold the whipped cream into the cream cheese mixture until just combined.
- Add Crushed Oreos: Gently fold in the crushed Oreo cookies into the filling.
- Unroll and Fill Cake: Once the cake is completely cool, carefully unroll it on a piece of fresh parchment paper or a clean surface. Spread the cookies and cream filling evenly over the entire surface of the cake, leaving a 1/2-inch border along the edges.
- Re-Roll the Cake: Starting from the same short end you rolled it from originally, carefully and tightly re-roll the cake, without the towel this time. Use the parchment paper to help you lift and roll evenly.
- Chill the Cake Roll: Once rolled, wrap the cake roll tightly in plastic wrap and refrigerate for at least 1 hour (preferably 2-3 hours) to allow the filling to set and the cake to firm up.
- Prepare Topping and Decorate: In a cold bowl, whip the 1/2 cup of cold heavy cream with 2 tablespoons of powdered sugar and 1/2 teaspoon of vanilla extract until stiff peaks form.
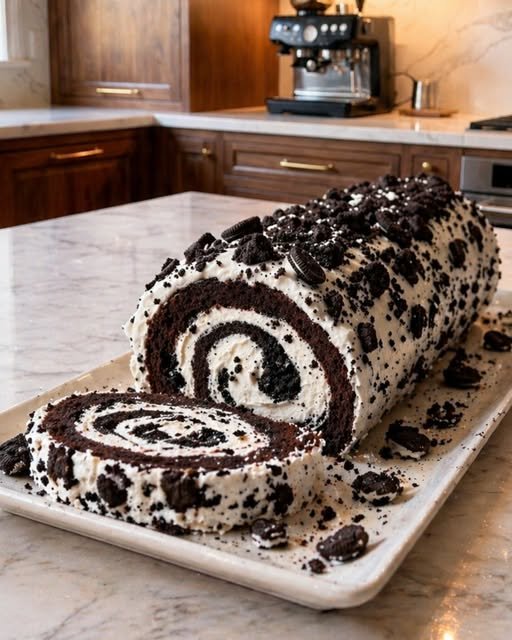
- Finish and Serve: Unwrap the chilled cake roll. Spread the whipped cream topping over the outside of the cake roll, creating swirls or peaks. Garnish with additional crushed Oreo cookies. Slice with a sharp, serrated knife for clean cuts and serve immediately.
Cooking Tips and Variations
Achieving the perfect cake roll can be a delicate dance, but with a few key tips, you’ll master it in no time. First and foremost, do not overbake your cake! An overbaked sponge will be dry and much more prone to cracking when rolled. The edges should just be pulling away from the pan, and the center should spring back lightly when touched. Another crucial step is rolling the cake while it’s still warm. The warmth allows the cake to be flexible and “set” into the rolled shape as it cools. If you wait for it to cool completely before the initial roll, it will almost certainly crack.
When preparing your kitchen towel for rolling, be generous with the powdered sugar. This prevents the cake from sticking to the towel and helps create a smooth surface. For the filling, ensure your cream cheese and butter are properly softened to room temperature; this will prevent lumps and ensure a smooth, creamy texture. When folding the whipped egg whites into the batter, be gentle. This is where the cake’s light and airy texture comes from. Overmixing will deflate the air you’ve worked so hard to incorporate.
For variations, consider swapping out the Oreo cookies for other crushed biscuits like chocolate chip cookies, graham crackers, or even gingersnaps for a festive twist. You could also add a layer of raspberry jam or a thin spread of chocolate ganache to the filling for an extra layer of flavor. If you’re feeling adventurous, replace some of the cocoa powder in the cake with espresso powder for a mocha-flavored cake roll. For a minty twist, add a few drops of peppermint extract to the filling and use mint-flavored Oreos. The possibilities are endless once you’ve mastered the basic technique!
Storage and Reheating
Storing your Cookies and Cream Cake Roll properly is key to maintaining its freshness and deliciousness. Once assembled and decorated, the cake roll should be stored in an airtight container or tightly wrapped in plastic wrap. This prevents it from drying out and absorbing any odors from the refrigerator. It will keep well in the refrigerator for up to 3-4 days. While technically edible beyond that, the cake may start to dry out, and the filling’s texture might change slightly.
For longer storage, you can freeze the cake roll. It’s best to freeze it before adding the final decorative whipped cream topping and garnish. Wrap the filled and rolled cake tightly in plastic wrap, then an additional layer of aluminum foil to prevent freezer burn. It can be frozen for up to 1 month. To thaw, transfer the frozen cake roll to the refrigerator overnight. Once thawed, you can then add the fresh whipped cream topping and crushed cookies before serving.
Reheating is generally not recommended for cake rolls, as the texture of the sponge cake and the cream-based filling can be negatively affected by heat. This is a dessert best enjoyed chilled or at room temperature, straight from the refrigerator. If you prefer it less cold, simply let a slice sit out on the counter for 15-20 minutes before serving. Enjoying it this way allows the flavors of the cake and filling to truly shine.
Frequently Asked Questions
What if my cake cracks when I roll it?
Cracking is a common issue with cake rolls, often due to overbaking or not rolling the cake while it’s warm enough. Ensure you don’t overbake; the cake should just spring back when touched. Also, roll the cake immediately out of the oven with the towel. If it still cracks slightly, don’t worry too much! The filling and frosting will often hide minor imperfections, and it will still taste delicious.
Can I make the cake or filling ahead of time?
Yes, you can! The chocolate sponge cake can be baked, rolled in the towel, and cooled completely, then tightly wrapped in plastic wrap and stored at room temperature overnight, or even frozen for up to a week. The cookies and cream filling can also be prepared a day in advance and stored in an airtight container in the refrigerator. Just give it a quick whip before spreading to fluff it up if it has stiffened.
What’s the best way to slice a cake roll?
For clean, beautiful slices, ensure your cake roll is thoroughly chilled – this helps the filling set and the cake firm up. Use a sharp, serrated knife. For each slice, wipe the blade clean with a damp cloth after each cut to prevent dragging crumbs and filling onto the next slice. A gentle sawing motion works best.
Can I make this cake roll without a jelly roll pan?
While a 10×15-inch jelly roll pan is ideal for the dimensions of a standard cake roll, you can use a slightly larger or smaller rectangular baking pan. Just be aware that the thickness of your cake will vary, which might affect baking time (thicker takes longer, thinner cooks faster). The key is to aim for a thin, flexible sponge, so adjust baking time accordingly.