Instructions
- Prepare the Roast: Pat the beef chuck roast thoroughly dry with paper towels. This step is crucial for achieving a good sear. Season generously all over with salt and freshly ground black pepper.
- Sear the Beef: Heat the olive oil in a large Dutch oven or oven-safe pot over medium-high heat until shimmering. Carefully place the seasoned beef roast into the hot oil. Sear on all sides until deeply browned, about 4-5 minutes per side. Browning creates a rich flavor foundation for the entire dish. Once browned, remove the roast from the pot and set aside on a plate.
- Sauté Aromatics: Reduce the heat to medium. Add the chopped onion to the pot and cook, stirring occasionally, until softened and translucent, about 5-7 minutes. Add the minced garlic and cook for another 1 minute until fragrant, being careful not to burn it.
- Deglaze and Build Flavor: Pour in the red wine (if using) and scrape up any browned bits from the bottom of the pot with a wooden spoon. Let the wine simmer for 2-3 minutes until it has reduced by about half. Stir in the tomato paste, Worcestershire sauce, dried thyme, and dried rosemary. Cook for 1 minute, stirring constantly, to allow the flavors to meld.
- Add Braising Liquid: Pour in the beef broth. Bring the liquid to a simmer, then return the seared beef roast to the pot. Ensure the liquid comes about halfway up the sides of the roast. Add the bay leaves.
- Braise in the Oven: Preheat your oven to 325°F (160°C). Cover the Dutch oven tightly with its lid and transfer it to the preheated oven. Braise for 2 hours.
- Add Vegetables: After 2 hours, carefully remove the pot from the oven. Add the cut potatoes and carrots around the roast in the pot. Stir gently to ensure they are partially submerged in the braising liquid.
- Continue Braising: Return the covered pot to the oven and continue to braise for another 1 to 1 ½ hours, or until the beef is fork-tender and the vegetables are tender. The cooking time can vary depending on the roast’s thickness and your oven.
- Rest the Roast: Once cooked, carefully remove the roast and vegetables from the pot and transfer them to a carving board or serving platter. Tent loosely with foil and let the meat rest for at least 15-20 minutes. This allows the juices to redistribute, resulting in a more tender and flavorful roast.
- Make the Gravy: While the roast is resting, prepare the gravy. Remove the bay leaves from the braising liquid in the pot. In a small bowl, whisk together the all-purpose flour and cold water to create a smooth slurry. Place the pot back on the stovetop over medium heat. Slowly whisk the flour slurry into the simmering braising liquid. Cook, stirring constantly, until the gravy thickens to your desired consistency, about 5-7 minutes. Taste and adjust seasoning with salt and pepper as needed. If the gravy is too thick, add a little more beef broth or water. If it’s too thin, simmer longer or add a bit more slurry.
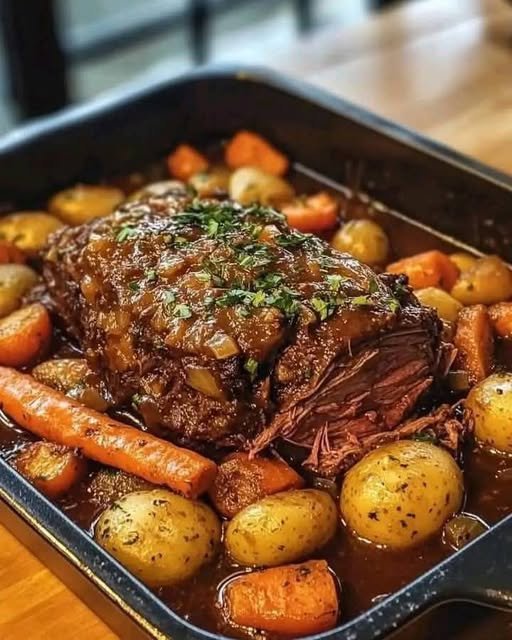
- Serve: Slice or shred the rested pot roast against the grain. Serve hot with the tender potatoes and carrots, generously spooning the rich gravy over everything. Garnish with fresh chopped parsley before serving.
Cooking Tips and Variations
Achieving the perfect pot roast is all about understanding a few key techniques and knowing how to adapt. Here are some tips to elevate your dish and variations to keep things interesting:
- The Importance of Searing: Do not skip searing the roast! This step doesn’t just give the meat a beautiful crust; it develops a deep, complex flavor through the Maillard reaction, which is crucial for the overall taste of your pot roast and gravy. Ensure your pot is hot and the oil is shimmering before adding the meat.
- Choosing the Right Cut: While chuck roast is the classic choice for its marbling and ability to become incredibly tender, other good options include beef brisket (flat cut or point), bottom round, or even a top round roast. Just remember that tougher cuts are best for braising.
- Braising Liquid Boosters: For even more depth, consider adding a splash of balsamic vinegar, a tablespoon of Dijon mustard, or a few sprigs of fresh thyme and rosemary (instead of dried) to your braising liquid. A touch of a dark beer can also add a unique richness.
- Vegetable Timing is Key: Adding denser vegetables like potatoes and carrots partway through the braising ensures they cook to tender perfection without becoming mushy. If you want to add quicker-cooking vegetables like peas, green beans, or mushrooms, stir them in during the last 15-20 minutes of cooking.
- For a Thicker Gravy: If you prefer an even thicker gravy, you can increase the amount of flour in your slurry. Alternatively, for a gluten-free option, use cornstarch slurry (1 tablespoon cornstarch mixed with 2 tablespoons cold water) in place of the flour.
- Slow Cooker Method: To adapt this recipe for a slow cooker, follow steps 1-4 (searing the beef and sautéing aromatics) on the stovetop. Transfer the seared beef and sautéed aromatics to the slow cooker insert. Add the braising liquid, tomato paste, Worcestershire, herbs, and bay leaves. Cook on low for 6-8 hours or on high for 3-4 hours. Add the potatoes and carrots during the last 2-3 hours of cooking on low, or the last 1-1.5 hours on high. Once cooked, remove the roast and vegetables, then make the gravy directly in the slow cooker by whisking in the flour slurry and simmering until thickened (you may need to switch to a “sauté” function if your slow cooker has one, or transfer the liquid to a saucepan).
- Instant Pot Method: Sear the beef and sauté aromatics using the “Sauté” function. Add all liquids, tomato paste, Worcestershire, herbs, and bay leaves. Place the beef back in. Pressure cook on high for 60 minutes for a 3-pound roast. Allow for a natural pressure release for 15 minutes, then quick release any remaining pressure. Remove the beef. Add the potatoes and carrots, then pressure cook on high for 5-7 minutes with a quick release. Remove vegetables, then make gravy using the “Sauté” function.
- Herb Garden Freshness: If you have fresh herbs, use them! A few sprigs of fresh rosemary and thyme tied together with kitchen twine can be added to the braising liquid for a more vibrant flavor. Remove them before serving.
- Spice It Up (Gently): For a subtle kick, add a pinch of red pepper flakes with the garlic.
Storage and Reheating
Pot roast is one of those magical dishes that often tastes even better the next day as the flavors have more time to meld and deepen. Proper storage and reheating are key to enjoying your leftovers safely and deliciously.
- Storing Leftovers: Allow the pot roast and vegetables to cool completely to room temperature (this usually takes 1-2 hours) before storing. Once cooled, transfer the pot roast, potatoes, carrots, and plenty of gravy into airtight containers. Store in the refrigerator for up to 3-4 days.
- Freezing: Pot roast freezes exceptionally well. Once cooled, place the meat, vegetables, and gravy into freezer-safe airtight containers or heavy-duty freezer bags. Ensure there’s minimal air in the containers to prevent freezer burn. It can be frozen for up to 3 months. Thaw overnight in the refrigerator before reheating.
- Reheating on the Stovetop: This is often the best method for reheating pot roast, as it helps retain moisture. Transfer the desired amount of pot roast, vegetables, and gravy to a saucepan or Dutch oven. Add a splash of beef broth or water if the gravy seems too thick. Heat over medium-low heat, stirring occasionally, until heated through. Do not boil vigorously, as this can dry out the meat.
- Reheating in the Oven: Preheat your oven to 300°F (150°C). Place the pot roast, vegetables, and gravy in an oven-safe dish. Add a little extra beef broth or water if needed. Cover the dish tightly with foil to prevent drying out. Heat for 20-30 minutes, or until thoroughly warmed through.
- Reheating in the Microwave: While convenient, the microwave can sometimes dry out the meat. For best results, place a single serving of pot roast, vegetables, and gravy in a microwave-safe dish. Cover loosely with a microwave-safe lid or damp paper towel. Heat on medium power in 1-2 minute intervals, stirring between intervals, until heated through.
Frequently Asked Questions
What type of beef is best for pot roast?
The best cut of beef for pot roast is typically a boneless chuck roast. It’s well-marbled with connective tissue that breaks down during slow cooking, resulting in incredibly tender, flavorful meat. Other good options include beef brisket, top round, or bottom round, all of which benefit from long, slow braising.
Why did my pot roast turn out tough?
If your pot roast is tough, it’s almost always due to insufficient cooking time. Pot roast cuts are inherently tough and require a long, slow braise to allow the connective tissues to break down and turn into gelatin, which makes the meat tender and moist. If it’s tough, simply continue cooking it, covered, in the oven or slow cooker until it easily shreds with a fork. Don’t rush the process!
Can I make this pot roast ahead of time?
Absolutely! Pot roast is an excellent make-ahead meal. The flavors often deepen and meld even further after a day or two in the refrigerator. Prepare the entire dish as instructed, let it cool, and then store it in an airtight container in the refrigerator. When you’re ready to serve, reheat it gently on the stovetop or in the oven until warmed through. This makes it perfect for entertaining or busy weeknights.
What can I use instead of red wine in the recipe?
If you prefer not to use red wine, you can simply substitute it with an equal amount of additional beef broth. While the wine adds a layer of depth and complexity, the pot roast will still be delicious without it. Another non-alcoholic option is to use a tablespoon of red wine vinegar or balsamic vinegar mixed with a bit of extra beef broth to mimic some of that acidic depth.