Instructions
- Preheat your oven to 375°F (190°C). Line two large baking sheets with parchment paper or silicone baking mats. This prevents sticking and promotes even baking.
- In a medium bowl, whisk together the all-purpose flour, baking soda, and salt. Make sure these dry ingredients are thoroughly combined to ensure even distribution in the dough. Set aside.
- In a large bowl, using an electric mixer (handheld or stand mixer with paddle attachment), cream together the softened unsalted butter, granulated sugar, and packed light brown sugar on medium speed. Beat until the mixture is light, fluffy, and pale in color, usually 2-3 minutes. This step is crucial for incorporating air and creating a tender cookie.
- Beat in the vanilla extract until just combined.
- Add the eggs one at a time, beating well after each addition. Scrape down the sides of the bowl as needed to ensure everything is fully incorporated. The mixture might look a little curdled at this point, but don’t worry, it will come together.
- Gradually add the dry ingredients to the wet ingredients, mixing on low speed until just combined. Be careful not to overmix the dough, as this can lead to tough cookies. Mix only until no streaks of flour remain.
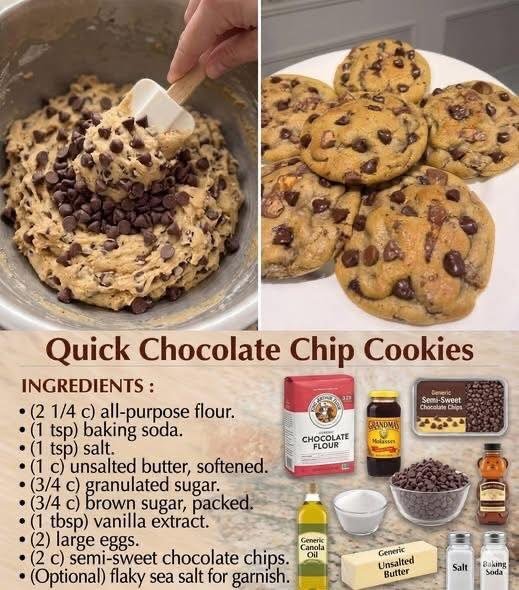
- Fold in the chocolate chips using a spatula or spoon until evenly distributed throughout the dough.
- Using a 1.5-2 tablespoon cookie scoop or two spoons, drop rounded balls of dough onto the prepared baking sheets, leaving about 2 inches between each cookie. If desired, lightly press a few extra chocolate chips onto the top of each dough ball for a more aesthetically pleasing cookie.
- If you’re using flaky sea salt, sprinkle a tiny pinch on top of each cookie dough ball before baking. This adds a wonderful contrast and enhances the chocolate flavor.
- Bake for 9-12 minutes, or until the edges are golden brown and the centers are still slightly soft and puffy. The exact baking time will depend on your oven and the size of your cookies. Do not overbake! They will continue to set as they cool.
- Remove the baking sheets from the oven and let the cookies cool on the sheets for 5-10 minutes before transferring them to a wire rack to cool completely. This allows the cookies to firm up and prevents them from breaking.
- Enjoy your perfectly baked chocolate chip cookies!
Cooking Tips and Variations
For truly exceptional chocolate chip cookies, attention to detail makes all the difference. Firstly, ensure your butter is genuinely softened, not melted. Softened butter creams beautifully with sugar, incorporating air that contributes to a light, tender texture. If your butter is too cold, it won’t cream properly; if it’s melted, your cookies will spread too much and be greasy. Room temperature usually means you can easily indent it with your finger without it being oily. Secondly, always measure your flour correctly. Spoon your flour into the measuring cup and then level it off with a straight edge. Dipping the measuring cup directly into the flour can compact it, leading to too much flour and dry, dense cookies.
Don’t overmix the dough once the flour is added. Overmixing develops the gluten in the flour, resulting in tough, chewy cookies (and not in a good way!). Mix only until the ingredients are just combined and no streaks of flour are visible. For an even chewier cookie and enhanced flavor, consider chilling your dough for at least 30 minutes, or even overnight. Chilling allows the flour to fully hydrate, the flavors to meld, and the butter to firm up, which helps prevent excessive spreading during baking. If chilling, you might need to add a minute or two to the baking time.
When it comes to variations, the possibilities are endless! Replace semi-sweet chocolate chips with milk chocolate, dark chocolate, white chocolate, or a combination. For an extra layer of flavor, try adding a handful of chopped nuts like walnuts or pecans. A pinch of cinnamon or a dash of almond extract can also elevate the flavor profile. For a truly gourmet touch, use chopped high-quality chocolate bars instead of chips; the varied sizes and shapes of the melted chocolate pieces create incredible pockets of gooey richness. You can also experiment with different types of sugar – using more brown sugar will result in a chewier, moister cookie, while more granulated sugar will yield a crispier edge.
To ensure your cookies bake evenly, rotate your baking sheets halfway through the baking time. This is especially helpful if your oven has hot spots. And remember, underbaked cookies are almost always better than overbaked ones. They will continue to cook slightly on the hot baking sheet even after being removed from the oven, so pull them out when the edges are set and golden but the centers still look a little soft and pale. Overbaking is the quickest way to dry, hard cookies.
Storage and Reheating
Proper storage is key to keeping your chocolate chip cookies fresh and delicious for as long as possible. Once completely cooled, store your cookies in an airtight container at room temperature. They will typically stay fresh for 3-5 days. To help maintain their softness, you can place half a slice of bread (any kind will do) inside the container with the cookies. The cookies will absorb moisture from the bread, keeping them soft and chewy. Just remember to replace the bread every day or two to prevent it from getting stale or molding.
If you’re planning to keep them longer, chocolate chip cookies freeze beautifully. Once completely cooled, place them in a single layer on a baking sheet and freeze until solid (about 1-2 hours). Then, transfer the frozen cookies to a freezer-safe airtight container or heavy-duty freezer bag. They can be stored in the freezer for up to 3 months. When you’re ready to enjoy them, simply thaw them at room temperature for a few hours, or reheat them for a few minutes.
To reheat, placing them in a microwave for 10-15 seconds will make them wonderfully warm and gooey, almost like they just came out of the oven. Be careful not to overheat, as this can make them tough. Alternatively, you can reheat them in a preheated oven at 275°F (135°C) for 5-7 minutes, or until warmed through. This method works especially well for frozen cookies, providing a crispier edge and soft interior. Avoid reheating them multiple times, as this can dry them out.
You can also freeze the raw cookie dough. Scoop the dough into balls and place them on a parchment-lined baking sheet. Freeze until solid, then transfer the frozen dough balls to a freezer-safe bag. You can bake them directly from frozen; just add an extra 2-4 minutes to the baking time, or until the edges are golden and the centers are set.
Frequently Asked Questions
Why are my cookies spreading too much?
Cookies spreading too much can be due to several factors. Your butter might have been too warm or melted, leading to a greasy dough that spreads quickly. The oven temperature might be too low, causing the butter to melt before the cookie has a chance to set. You might also have too little flour or too much sugar. Chilling the dough before baking can help significantly, as it solidifies the butter and prevents excessive spreading.
Can I use margarine instead of butter?
While you can technically use margarine, it’s generally not recommended for this recipe if you want the best results. Margarine has a different fat and water content than butter, which can significantly alter the texture and flavor of your cookies. Butter provides a richer flavor and contributes to the desirable chewy-crisp texture that margarine often cannot replicate. For optimal taste and texture, stick with unsalted butter.
How do I know when the cookies are done?
The perfect chocolate chip cookie is slightly underbaked. You’ll know they’re done when the edges are set and lightly golden brown, but the centers still look a bit soft, puffy, and slightly undercooked. They will continue to cook and set on the hot baking sheet after you remove them from the oven. If you wait until the centers are fully firm in the oven, you’ll likely end up with dry, overbaked cookies.
My cookies are hard and dry, what went wrong?
Hard and dry cookies are usually a sign of overbaking or overmixing the dough. Baking them for too long at too high a temperature will remove too much moisture, making them tough. Overmixing the dough develops the gluten, leading to a dense and hard texture. Ensure you measure your flour correctly (not too much) and follow the baking times closely, pulling them out when the centers are still slightly soft. Using softened, not melted, butter and not skimping on the brown sugar also helps maintain moisture.