Instructions
- Preheat your oven to 325°F (160°C). Grease and flour an 8×8 inch square baking pan or line with parchment paper, leaving an overhang on two sides to easily lift the cheesecake out later.
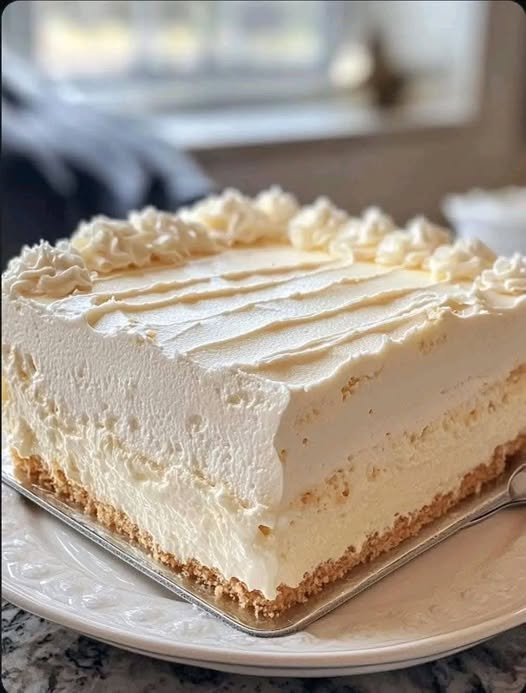
- Prepare the Crust: In a medium bowl, combine the graham cracker crumbs, granulated sugar, and ground cinnamon (if using). Pour in the melted butter and stir until the crumbs are evenly moistened and resemble wet sand.
- Press the mixture firmly and evenly into the bottom of the prepared square baking pan. You can use the bottom of a glass or your fingers to compact it.
- Bake the crust for 8-10 minutes, or until lightly golden and fragrant. Remove from the oven and let it cool slightly while you prepare the filling. Do not turn off the oven; keep it at 325°F (160°C).
- Prepare the Cheesecake Filling: In a large mixing bowl, using an electric mixer on medium speed, beat the softened cream cheese until smooth and creamy, about 2-3 minutes. Make sure there are no lumps.
- Gradually add the granulated sugar to the cream cheese, beating until well combined and light and fluffy, scraping down the sides of the bowl as needed.
- Add the eggs one at a time, beating on low speed after each addition just until incorporated. Be careful not to overmix the eggs, as this can introduce too much air and lead to cracks in the cheesecake.
- Stir in the vanilla extract, sour cream (or heavy cream), all-purpose flour, and a pinch of salt. Mix on low speed until just combined and smooth. Do not overmix.
- Pour the cheesecake filling over the cooled graham cracker crust in the prepared pan. Gently tap the pan on the counter a few times to release any air bubbles.
- Baking the Cheesecake: Place the cheesecake pan into a larger roasting pan. Carefully pour hot water into the roasting pan, creating a water bath, until the water comes about halfway up the sides of the cheesecake pan. This water bath helps to ensure even baking and prevents cracking.
- Carefully transfer the roasting pan with the cheesecake to the preheated oven.
- Bake for 50-60 minutes, or until the edges are set but the center still has a slight jiggle when you gently shake the pan. The internal temperature should reach about 150°F (65°C).
- Cooling the Cheesecake: Once baked, turn off the oven, but leave the cheesecake in the oven with the door ajar for 1 hour. This slow cooling process is crucial for preventing cracks.
- After 1 hour, carefully remove the cheesecake from the water bath and the oven. Let it cool completely on a wire rack at room temperature for another 1-2 hours.
- Once completely cooled, cover the cheesecake with plastic wrap and refrigerate for at least 6 hours, or preferably overnight, to allow it to set fully.
- Prepare the Whipped Frosting: In a cold mixing bowl, combine the very cold heavy cream, powdered sugar, and vanilla extract. Beat on high speed with an electric mixer until stiff peaks form. Be careful not to overbeat, or it will turn into butter.
- Decorate and Serve: Once the cheesecake is thoroughly chilled and set, carefully lift it out of the pan using the parchment paper overhang. Remove the parchment paper.
- Transfer the cheesecake to a serving platter. Using a piping bag fitted with a decorative tip (like a star tip), pipe the whipped frosting along the edges of the cheesecake for a beautiful finish.
- Slice with a warm, clean knife for neat portions and serve chilled.
Cooking Tips and Variations
To achieve the smoothest, creamiest cheesecake, ensure all your dairy ingredients, especially the cream cheese and eggs, are at room temperature. This helps them incorporate uniformly without lumps, preventing overmixing which can introduce too much air and cause cracks. When beating the cream cheese, start on medium speed until it’s perfectly smooth before adding sugar. For the eggs, add them one at a time and mix on the lowest speed just until combined. Overmixing after the eggs are added is a common culprit for a cracked surface.
A water bath is your best friend for a perfectly baked, crack-free cheesecake. It creates a moist, even heat environment, ensuring the cheesecake cooks gently from the outside in. If you’re nervous about water leaking into your springform pan, wrap the outside of the pan securely with several layers of heavy-duty aluminum foil before placing it in the water bath. The slow cooling process is equally vital; leaving the cheesecake in the turned-off oven with the door slightly ajar allows it to cool gradually, preventing a sudden temperature shock that can cause it to crack or sink.
For variations, consider infusing the filling with different flavors. Add lemon zest for a bright, citrusy note, or a tablespoon of espresso powder for a rich coffee cheesecake. Swirl in melted chocolate or fruit purees (like raspberry or blueberry) during the final mixing stage for a marbled effect. The crust can also be customized; try using crushed Oreos, shortbread cookies, or even gingersnaps for unique flavor profiles. For toppings, the possibilities are endless: fresh berries, chocolate ganache, caramel sauce, a fruit compote, or a simple dusting of cocoa powder or powdered sugar can elevate your cheesecake to new heights.
Storage and Reheating
Cheesecake is best stored in the refrigerator. Once completely cooled and set, cover it tightly with plastic wrap or place it in an airtight container to prevent it from absorbing odors from other foods in the fridge. Properly stored, cheesecake will last for 3-5 days in the refrigerator. If your cheesecake is topped with fresh fruit, it’s best to add the fruit just before serving, as some fruits can release moisture and make the cheesecake soggy over time.
For longer storage, cheesecake freezes beautifully. To freeze, first ensure the cheesecake is fully chilled and firm. If it’s a whole cheesecake, you can wrap it tightly in several layers of plastic wrap, then a layer of aluminum foil. For individual slices, place them on a baking sheet lined with parchment paper and freeze for an hour until firm, then wrap each slice individually in plastic wrap and foil. Frozen cheesecake can be stored for up to 1-2 months. To thaw, transfer the frozen cheesecake (whole or slices) to the refrigerator and let it thaw overnight or for several hours until soft enough to serve. Do not thaw at room temperature, as this can affect its texture. Cheesecake is typically served chilled, so reheating is not usually necessary or recommended, as it can alter the delicate texture.
Frequently Asked Questions
How do I prevent my cheesecake from cracking?
Cracking is a common concern with cheesecakes, but it’s largely preventable. The key is to avoid overmixing the batter, especially after adding the eggs, as this incorporates too much air. Using room-temperature ingredients ensures a smooth, lump-free batter without excessive mixing. Baking in a water bath provides a moist, even cooking environment, and most importantly, allowing the cheesecake to cool slowly in the oven with the door ajar prevents sudden temperature changes that cause the top to contract and crack.
Can I make this cheesecake ahead of time?
Absolutely! Cheesecake is an excellent make-ahead dessert. In fact, it tastes even better the day after it’s made, as the flavors have more time to meld and the texture becomes perfectly set. You can bake and chill the cheesecake up to 2-3 days in advance. Just store it covered in the refrigerator. If you’re adding a fresh fruit topping or whipped cream, it’s best to do that just before serving to maintain freshness and appearance.
What if I don’t have a square baking pan?
While this recipe specifically uses an 8×8 inch square pan to achieve the look in the image, you can certainly use a different pan. An 8-inch or 9-inch round springform pan would work perfectly. If using a springform pan, be sure to wrap the bottom and sides tightly with aluminum foil before placing it in a water bath to prevent any leaks. The baking time might be slightly adjusted; a round pan might bake a little faster or slower depending on its exact dimensions and the thickness of the batter.
Why did my cheesecake sink in the middle?
A sunken center can be a sign of either underbaking or overbaking. If it’s underbaked, the structure isn’t fully set, and it will collapse as it cools. If it’s overbaked, the proteins tighten too much, and as it cools, the center can fall. Ensure you bake until the edges are set but the center still has a slight jiggle. Also, rapid cooling can contribute to sinking, which is why the slow cooling method in the turned-off oven is so important.