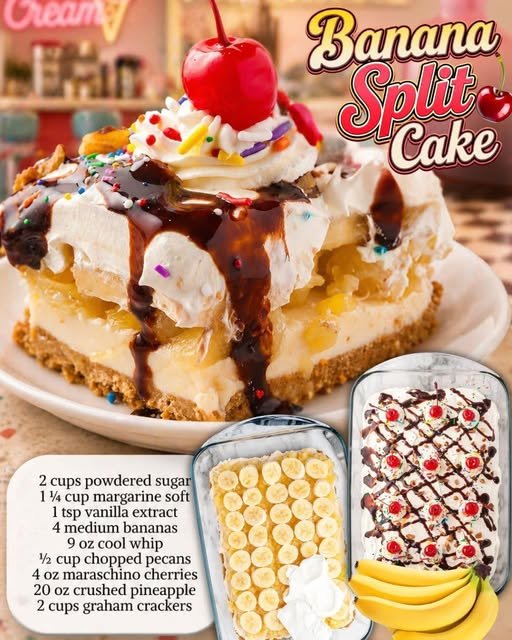
Instructions
- Prepare the Crust: In a medium bowl, combine the graham cracker crumbs and melted butter. Mix until well combined and the crumbs are evenly moistened.
- Press the crumb mixture firmly and evenly into the bottom of a 9×13-inch baking dish. You can use the back of a spoon or your fingers to compact it.
- Place the crust in the refrigerator to chill while you prepare the filling, about 15-20 minutes.
- Prepare the Banana and Pineapple Layer: Once the crust is chilled, arrange the sliced bananas in a single layer over the graham cracker crust.
- Evenly spread the well-drained crushed pineapple over the banana slices. Ensure the pineapple is as dry as possible to prevent the cake from becoming watery.
- Make the Cream Cheese Filling: In a large bowl, using an electric mixer, beat the softened cream cheese until smooth and creamy.
- Gradually add the powdered sugar to the cream cheese, beating until light and fluffy. Stir in the vanilla extract.
- Gently fold in half of the thawed whipped topping (about 6 ounces) into the cream cheese mixture until no streaks remain. Be careful not to overmix, which can deflate the whipped topping.
- Assemble the Cake: Carefully spread the cream cheese filling evenly over the pineapple layer in the baking dish.
- Add the Top Layer: Spread the remaining thawed whipped topping (the other 6 ounces) over the cream cheese layer, smoothing it out with an offset spatula or the back of a spoon.
- Chill Thoroughly: Cover the baking dish loosely with plastic wrap and refrigerate for at least 4 hours, or preferably overnight. This chilling time is crucial for the cake to set properly and for the flavors to meld beautifully.
- Garnish and Serve: Just before serving, drizzle the chocolate syrup generously over the top of the cake.
- Sprinkle the chopped pecans or walnuts over the chocolate syrup.
- Place the maraschino cherries artfully on top of the cake. If desired, add some sprinkles for extra festive flair.
- Cut into squares and serve chilled.
Cooking Tips and Variations
For the best results with your Banana Split Cake, pay attention to these tips. Firstly, ensure your graham cracker crumbs are finely crushed. A food processor works wonders for this, creating an even texture that binds well with the melted butter. When pressing the crust into the pan, really compact it. A firm crust is essential to hold up to the layers of fruit and filling. Use the bottom of a glass or a flat measuring cup to get a nice, tight base. As for the bananas, choose ones that are ripe but still quite firm; overly ripe bananas can become mushy and release too much moisture into the cake. Slice them evenly so each piece gets a good banana flavor.
One of the most critical steps is thoroughly draining the crushed pineapple. Excess liquid will make your cake soggy, so press out as much juice as possible, perhaps even pressing it between layers of paper towels. When making the cream cheese filling, ensure your cream cheese is at room temperature. This will allow it to beat smoothly without lumps, creating a wonderfully creamy texture. Gently folding in the whipped topping is key; aggressive mixing can deflate it, resulting in a less airy filling. Don’t rush the chilling process; at least 4 hours, or even better, overnight, allows the cake to set firmly and the flavors to deepen and meld together beautifully. This also makes for much cleaner slices.
This recipe is also incredibly versatile! For a different crust, you could use vanilla wafer crumbs or even chocolate cookie crumbs. If you’re not a fan of pecans, walnuts are a classic alternative, or you could try toasted almonds for a different flavor profile. For an extra chocolatey kick, you can sprinkle mini chocolate chips over the banana and pineapple layer, or even mix some into the cream cheese filling. A layer of thinly sliced strawberries could be added along with the bananas for an even fruitier twist, though be mindful of the added moisture. You could also experiment with different flavored whipped toppings, such as a chocolate-flavored whipped cream, for a richer dessert. For a more sophisticated presentation, consider garnishing with chocolate shavings instead of or in addition to the sprinkles. If you want a more decadent chocolate drizzle, warm up some fudge sauce slightly before serving. Just remember that any additions might slightly alter the nutritional values and chilling time.
Storage and Reheating
This Banana Split Cake is best enjoyed fresh and chilled. Store any leftovers in an airtight container or cover the baking dish tightly with plastic wrap. It must be kept refrigerated due to the fresh fruit and dairy components. When properly stored in the refrigerator, the cake will last for 2-3 days. After that, the bananas may start to brown and become too soft, and the overall texture of the cake might begin to degrade.
Reheating is not recommended for this no-bake dessert. The whipped topping and cream cheese filling are meant to be served chilled, and heating them would alter their texture and consistency, turning them into a soupy mess. The fresh fruit would also suffer from heating. This cake is designed to be a refreshing, cool treat, so simply take it out of the refrigerator, slice, and serve directly.
Frequently Asked Questions
Can I make Banana Split Cake ahead of time?
Absolutely! In fact, making it ahead of time is highly recommended. The cake needs at least 4 hours to chill and set, but chilling it overnight allows the flavors to truly meld and the layers to become perfectly firm, making for easier and cleaner slices. Just hold off on adding the final garnishes (chocolate syrup, nuts, and cherries) until just before serving to keep them fresh and appealing.
Why did my Banana Split Cake turn out watery?
A watery Banana Split Cake is usually due to excess moisture from the fruit. The most common culprits are insufficiently drained crushed pineapple or overly ripe bananas. Make sure to press as much liquid out of the crushed pineapple as possible. If using very ripe bananas, they will release more moisture; try to use bananas that are ripe but still firm. Also, ensure the cake is thoroughly chilled, as this helps the filling set and contain any minor moisture.
Can I use homemade whipped cream instead of store-bought whipped topping?
Yes, you can definitely use homemade whipped cream! For best results, use heavy cream that is very cold, and whip it with a little powdered sugar and vanilla until stiff peaks form. However, store-bought whipped topping (like Cool Whip) tends to be more stable and holds its shape longer, which is beneficial for a no-bake cake that needs to sit for a while. If using homemade whipped cream, you might want to add a stabilizer like a little unflavored gelatin to help it hold up better, especially if the cake will be out for an extended period.