Instructions
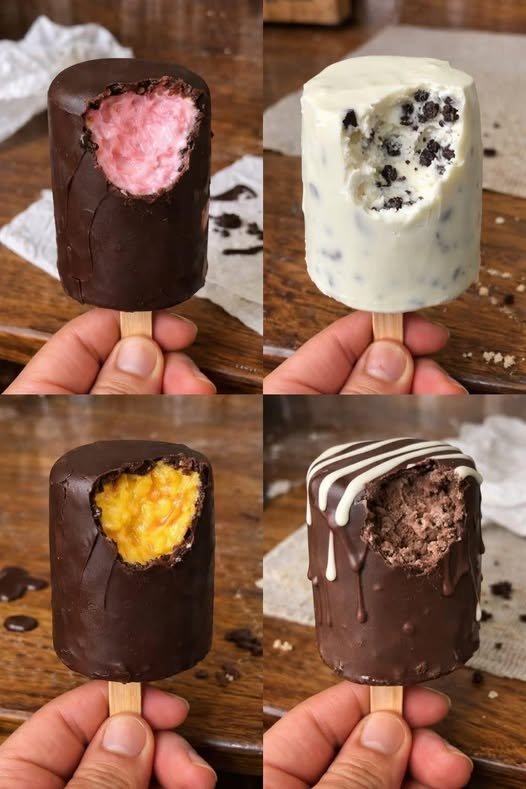
- Prepare the Strawberry Filling: In a blender, combine the fresh strawberries, ¼ cup sugar, and 2 tablespoons lemon juice. Blend until smooth. Taste and adjust sweetness if necessary. Stir in the Greek yogurt or coconut cream until just combined.
- Prepare the Cookies & Cream Filling: In a medium bowl, whisk together the milk, heavy cream, ¼ cup sugar, and vanilla extract until the sugar is dissolved. Gently fold in the crushed Oreo cookies.
- Prepare the Mango Filling: In a blender, combine the diced mango, ¼ cup sugar, and 1 tablespoon lime juice. Blend until smooth. Taste and adjust sweetness if necessary. Stir in the Greek yogurt or coconut cream until just combined.
- Prepare the Double Chocolate Filling: In a small saucepan, whisk together the milk, heavy cream, cocoa powder, ½ cup sugar, vanilla extract, and a pinch of salt. Heat over medium-low heat, stirring constantly, until the mixture is warm and the sugar and cocoa powder are fully dissolved. Do not boil. Remove from heat and let cool slightly.
- Fill the Glass Cups: For each flavor, carefully pour the prepared mixture into the glass cups, leaving about ½ inch of space from the top. You can make 2 of each flavor or mix and match.
- Insert Popsicle Sticks: Once the cups are filled, cover each cup with a small piece of aluminum foil or plastic wrap. Carefully make a small slit in the center of the foil/wrap and insert a popsicle stick into each cup. This helps the stick stay upright as the popsicles freeze.
- Freeze: Transfer the filled glass cups to the freezer. Freeze for at least 6-8 hours, or preferably overnight, until completely solid.
- Prepare for Dipping: Once the popsicles are fully frozen, prepare your dipping chocolate. In a microwave-safe bowl, combine the dark chocolate chips and coconut oil (if using). Microwave in 30-second intervals, stirring well after each, until the chocolate is melted and smooth. Alternatively, melt over a double boiler. Pour the melted dark chocolate into a tall, narrow glass or mug. If using white chocolate for drizzle, melt it separately in a small bowl in the microwave or double boiler.
- Remove Popsicles from Cups: To easily remove the frozen popsicles from the glass cups, run the outside of each glass cup under warm water for 10-15 seconds. Gently twist and pull the popsicle stick upwards. The popsicle should slide out cleanly. Work quickly to prevent melting.
- Dip the Popsicles: Holding a popsicle by its stick, quickly dip it into the tall glass of melted dark chocolate, rotating to coat evenly. Allow any excess chocolate to drip off. If desired, immediately drizzle with melted white chocolate for an extra touch.
- Set the Chocolate: Place the dipped popsicles on a baking sheet lined with parchment paper. Return them to the freezer immediately for 5-10 minutes, or until the chocolate coating is completely set and firm.
- Serve and Enjoy: Once the chocolate is set, your homemade popsicles are ready to be devoured!
Cooking Tips and Variations
For the best results, always use high-quality ingredients, especially when it comes to chocolate and fresh fruits. Ripe fruits will yield the most flavorful popsicles, requiring less added sugar. When blending your fruit mixtures, taste and adjust the sweetness to your preference before freezing; remember that flavors can be slightly muted when frozen. For an extra creamy texture in your fruit-based popsicles, consider adding a tablespoon of full-fat coconut milk or heavy cream to the mixture before blending. If you don’t have glass cups, you can use traditional popsicle molds, but the glass cup method gives them that unique cylindrical shape perfect for dipping. To ensure your popsicle sticks stay centered, you can also use a piece of aluminum foil to cover the top of the cup, then poke the stick through the center of the foil. This acts as a stabilizer. When melting chocolate for dipping, a little coconut oil goes a long way in creating a smoother, thinner consistency that coats the popsicles beautifully and prevents cracking. Make sure your melted chocolate is not too hot, as this can cause the popsicle to melt too quickly upon dipping. It should be warm enough to be fluid but not scalding. Work quickly when dipping, and have your parchment-lined baking sheet ready in the freezer so you can transfer the dipped popsicles back immediately to set the chocolate. For a fun variation, try adding mini chocolate chips, chopped nuts, or sprinkles to the chocolate coating before it sets. You can also experiment with different fruit combinations for the fillings, such as raspberry and peach, or pineapple and coconut. For the cookies and cream, consider using different types of sandwich cookies or even crushed graham crackers for a s’mores-inspired treat. The double chocolate can be enhanced with a pinch of espresso powder to deepen the chocolate flavor. For a healthier twist, swap out some of the sugar for natural sweeteners like maple syrup or honey, or reduce the sugar content entirely if your fruits are naturally sweet. The Greek yogurt or coconut cream in the fruit popsicles adds a lovely tang and creaminess, but you can omit it for a purely fruit-based ice pop. Always ensure your popsicles are completely frozen solid before attempting to remove them from the cups and especially before dipping; this prevents them from breaking apart and helps the chocolate set quickly and evenly. A good rule of thumb is at least 6-8 hours, but overnight is always best for optimal firmness.
Storage and Reheating
Once your homemade popsicles are fully set and the chocolate coating is firm, they are ready for storage. To prevent them from sticking together or developing freezer burn, individually wrap each popsicle in plastic wrap or parchment paper. This also helps to protect their delicate chocolate coating. After wrapping, place the popsicles in an airtight freezer-safe container or a large freezer bag. This extra layer of protection minimizes exposure to air, which can cause ice crystals to form and affect the texture and flavor. Stored properly, these homemade popsicles can last in the freezer for up to 2-3 weeks. Beyond this timeframe, while still safe to eat, their quality might start to decline, and they may lose some of their vibrant flavor and smooth texture. There is no reheating involved with popsicles, as they are meant to be enjoyed frozen. Simply remove a popsicle from the freezer, unwrap it, and enjoy immediately. If they have been stored for a while and are rock solid, you might let them sit at room temperature for a minute or two to slightly soften for a more enjoyable eating experience, but be careful not to let them melt too much, especially with the chocolate coating.
Frequently Asked Questions
How do I prevent my homemade popsicles from being too icy?
To achieve a creamier texture rather than an icy one, incorporate dairy or a fat source into your mixtures. For fruit-based popsicles, adding Greek yogurt, coconut cream, or a touch of heavy cream helps create a smoother consistency. For chocolate or creamy popsicles, using whole milk, heavy cream, or full-fat coconut milk is key. Also, avoid over-blending fruit mixtures, as too much air can lead to more ice crystals.
Can I make these popsicles without added sugar?
Absolutely! If your fruits are very ripe, they often provide enough natural sweetness. You can taste the mixture before freezing and adjust accordingly. For those who prefer a touch of sweetness without refined sugar, natural sweeteners like maple syrup, honey, or agave nectar can be used as substitutes. Start with a small amount and increase to your preference.
What if my chocolate coating cracks or doesn’t set smoothly?
Chocolate cracking often occurs if the popsicle is too cold or the chocolate is too thick and brittle. To prevent this, ensure your melted chocolate isn’t too hot (which can melt the popsicle) and add a teaspoon of coconut oil to thin it slightly for a smoother, more elastic coating. Also, ensure the popsicle is completely frozen but not excessively cold directly from deep freeze. When dipping, move quickly and allow excess chocolate to drip off before placing it back in the freezer to set.
Can I use paper cups instead of glass cups?
Yes, you can definitely use small paper cups instead of glass cups. Paper cups are often easier to remove the popsicles from, as you can simply tear or peel away the cup. However, glass cups offer a reusable and more eco-friendly option, and they provide a slightly smoother, more uniform cylindrical shape. If using paper cups, make sure they are sturdy enough to hold the liquid without collapsing in the freezer.