Instructions
- Prepare the Graham Cracker Topping: In a medium bowl, combine the crushed graham crackers and melted butter. Mix until well combined. Set aside.
- Prepare the Strawberry Layer: In a blender or food processor, combine the hulled and quartered strawberries with 1/4 cup of granulated sugar. Blend until smooth. Pour the strawberry puree into a small saucepan.
- Bloom and Dissolve Gelatin (Strawberry): In a small bowl, sprinkle 1/2 of one gelatin envelope (about 1.25 teaspoons) over 1/4 cup cold water. Let stand for 5 minutes to bloom.
- Heat Strawberry Puree: Heat the strawberry puree over medium-low heat, stirring occasionally, until just simmering. Remove from heat. Add the bloomed gelatin to the hot strawberry puree and stir until completely dissolved. Let cool completely to room temperature.
- Prepare the Pineapple Layer: Drain the crushed pineapple well, pressing out as much liquid as possible. In a medium bowl, combine the drained crushed pineapple with 1/4 cup of granulated sugar. Set aside.
- Prepare the Cream Cheese Base: In a large mixing bowl, using an electric mixer, beat the softened cream cheese until smooth and creamy. Add the sweetened condensed milk and vanilla extract, beating until well combined and smooth.
- Fold in Whipped Topping: Gently fold in the thawed whipped topping (or freshly whipped cream) into the cream cheese mixture until no streaks remain. This will be the creamy base for your layers.
- Assemble the First Cream Layer: Pour half of the cream cheese mixture into a 9×13 inch baking dish, spreading it evenly across the bottom. Place the dish in the refrigerator to chill for about 15-20 minutes, allowing it to firm up slightly.
- Assemble the Strawberry Layer: Once the first cream layer is slightly set, carefully pour the cooled strawberry puree over it, spreading it gently to create an even layer. Return the dish to the refrigerator for another 20-30 minutes, or until the strawberry layer is mostly set but still slightly soft.
- Assemble the Second Cream Layer: Once the strawberry layer has set, carefully spread the remaining half of the cream cheese mixture over the strawberry layer. Return the dish to the refrigerator for 15-20 minutes.
- Assemble the Pineapple Layer: Drain the crushed pineapple again if any liquid has accumulated. Carefully spread the drained crushed pineapple evenly over the second cream layer. Return the dish to the refrigerator for 20-30 minutes, or until the pineapple layer is mostly set.
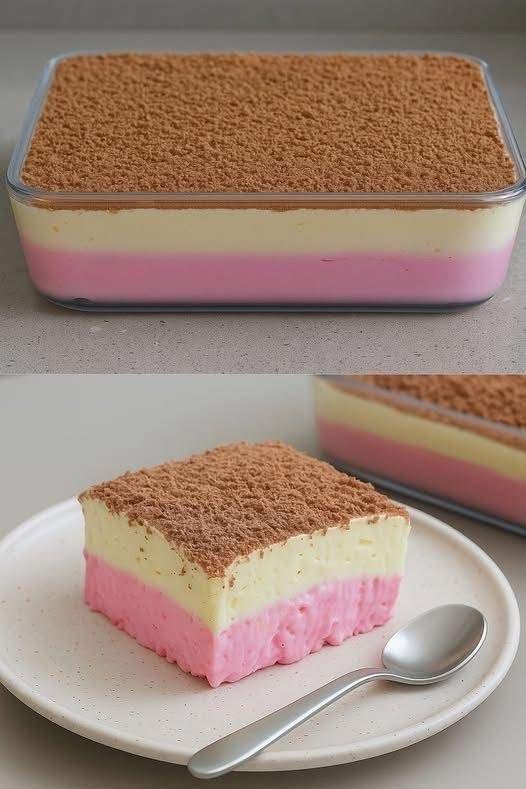
- Add the Topping: Once all layers are set, evenly sprinkle the prepared graham cracker and melted butter topping over the pineapple layer.
- Final Chill: Cover the baking dish loosely with plastic wrap and refrigerate for at least 4 hours, or preferably overnight, to allow all layers to firm up completely and flavors to meld.
- Garnish and Serve: Before serving, you can garnish with additional fresh strawberry slices or pineapple chunks if desired. Slice into squares and serve chilled.
Cooking Tips and Variations
To ensure your Strawberry & Pineapple Layered Dessert turns out perfectly every time, a few key tips can make all the difference. Firstly, proper chilling between layers is absolutely crucial. Rushing this step can lead to layers blending together, losing that beautiful distinct appearance. Aim for at least 15-20 minutes of chilling for the cream layers and 20-30 minutes for the fruit layers, or until they are firm enough to support the next addition without mixing. If your kitchen is warm, you might need a little longer. When spreading subsequent layers, do so gently, starting from the edges and working your way inwards, to avoid disturbing the layer beneath.
For the freshest flavor, always use ripe, in-season strawberries. If fresh strawberries are unavailable, frozen unsweetened strawberries can be used, but you might need to adjust the sugar content slightly after tasting the puree. For the pineapple, using canned crushed pineapple is convenient, but ensure it is thoroughly drained. Excess moisture can make your layers watery and prevent them from setting properly. Pressing the pineapple against a sieve with the back of a spoon is a good way to extract as much liquid as possible.
The cream cheese should be at room temperature for easy blending, ensuring a smooth and lump-free base. If you prefer to use fresh whipped cream instead of frozen whipped topping, whip 2 cups of heavy cream with 1/4 cup of powdered sugar and 1 teaspoon of vanilla extract until stiff peaks form, then gently fold it into the cream cheese mixture.
Beyond the classic graham cracker topping, there are many delightful variations to explore. You could use crushed vanilla wafers, shortbread cookies, or even a mixture of crushed nuts like pecans or almonds for an added textural dimension. For a chocolatey twist, finely chopped white chocolate or dark chocolate shavings sprinkled on top would be exquisite. A drizzle of white chocolate ganache or a light dusting of powdered sugar just before serving can also elevate its presentation.
Consider other fruit combinations for different flavor profiles. A mango and passion fruit layer could offer a tropical explosion, while raspberry and peach would be a delightful summer alternative. Just ensure the fruit purees are thick enough to set with gelatin. For those who prefer a less sweet dessert, you can reduce the amount of granulated sugar in the fruit layers, especially if your fruit is very ripe and naturally sweet. Always taste your fruit purees before adding gelatin to get the sweetness just right.
Finally, for an extra touch of elegance, consider lining your baking dish with parchment paper, leaving an overhang on the sides. This will make it incredibly easy to lift the entire dessert out of the dish before slicing, resulting in clean, perfect squares. If you’re serving individual portions, this dessert can also be assembled in smaller ramekins or clear glasses for a beautiful single-serving presentation.
Storage and Reheating
This Strawberry & Pineapple Layered Dessert is designed to be enjoyed chilled, making storage straightforward. Once fully assembled and set, cover the baking dish tightly with plastic wrap or aluminum foil. Store the dessert in the refrigerator for up to 3-4 days. The airtight cover is crucial to prevent the dessert from absorbing odors from other foods in the refrigerator and to keep the layers fresh and moist.
Due to its no-bake nature and the use of gelatin and fresh fruit, this dessert does not require reheating and should always be served cold. Reheating would cause the gelatin to melt, leading to a runny and undesirable texture. It’s best enjoyed straight from the refrigerator, allowing the cool, creamy, and fruity flavors to refresh your palate.
If you have leftovers, simply re-cover the dish and place it back in the refrigerator. The flavors tend to meld even more beautifully after a day or two, so it can sometimes taste even better the next day! However, keep an eye on the freshness of the fruit, as some fruits can start to soften or brown after extended periods. For the best quality and taste, consume within the recommended timeframe.
Frequently Asked Questions
What kind of gelatin should I use for this recipe?
You should use unflavored gelatin, typically sold in small envelopes. Each envelope usually contains about 1 tablespoon or 7 grams of gelatin powder. This allows you to add the setting power without introducing any additional flavors that might conflict with the strawberry and pineapple.
Can I use fresh pineapple instead of canned?
Yes, you can use fresh pineapple, but there’s an important consideration. Fresh pineapple contains an enzyme called bromelain, which can prevent gelatin from setting. To use fresh pineapple, you must cook it first (briefly boil or simmer) to deactivate this enzyme. Once cooked and cooled, you can crush and drain it as you would canned pineapple before incorporating it into the dessert.
Can I make this dessert ahead of time?
Absolutely! This dessert is an excellent make-ahead option. In fact, it requires a significant amount of chilling time, ideally overnight, to allow all the layers to fully set and the flavors to meld beautifully. You can prepare it a day or two in advance, cover it tightly, and store it in the refrigerator until you’re ready to serve.